Episerver Addon for Fotoware: Installation, configuration, and use
This Episerver add-on integrates Fotoware DAM with Episerver CMS and Commerce
The add-on is available from the Episerver Nuget Feed (download links below)
Before you start
This article is technical in nature and stipulates knowledge of the Episerver ecosystem. We recommend getting the assistance of someone experienced with Episerver integrations to set up and configure the add-on.
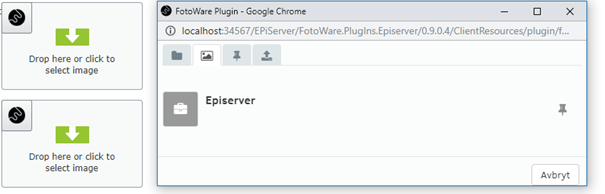
Example Image Property and selection dialog from Fotoware
Example: TinyMce Toolbox button

How it works
When an asset is selected, the asset is imported into the default Episerver asset management repository and used in an image property (of type ContentReference or Url) or the Rich Text editor. There is also an Episerver scheduled job (to be enabled after installation), which ensures that the imported images and metadata are kept up to date in Episerver if they change in Fotoware.
Key features of the integration:
- Easy to add to Episerver solutions, both new and existing solutions.
- The integration can be removed without affecting used assets.
- Used assets from Fotoware are synchronized into Episerver's default asset management, making it easy for developers familiar with Episerver to get started.
- It is possible to configure media to show only local assets, only assets from Fotoware, or both.
- Developers can configure their own media models containing the metadata to be synchronized with Fotoware.
- Since downloaded media becomes standard Episerver media items, Episerver keeps track of which media is used where in the solution.
**Note**
Versions 1, 2, and 3 only support imports of static images such as .jpg files. PDFs may work but are not meant to. Video, .svg files, transparent PNGs, and animated gifs are not currently supported.
Installation
You can find information on Nuget.episerver.com : https://nuget.episerver.com/package/...gIns.Episerver (external link)
Installing and configuring the add-on takes less than one hour.
Dependencies
- This add-on requires at least EPiServer.CMS.UI 11.15.
- The add-on also automatically adds support for Episerver Commerce and should work on version 12 and above.
- Version 2 of EPiServer.CMS. TinyMce is needed for the toolbox button in editor.
Registering the Selection Widget integration with Fotoware
Before setting up the Episerver integration, you must register the application in the Fotoware Site Configuration:
Log in to your Fotoware tenant and go to Tools (cogwheel icon) > Site configuration > Integrations > Applications.
Select Add application to set up the integration for the Selection Widget.
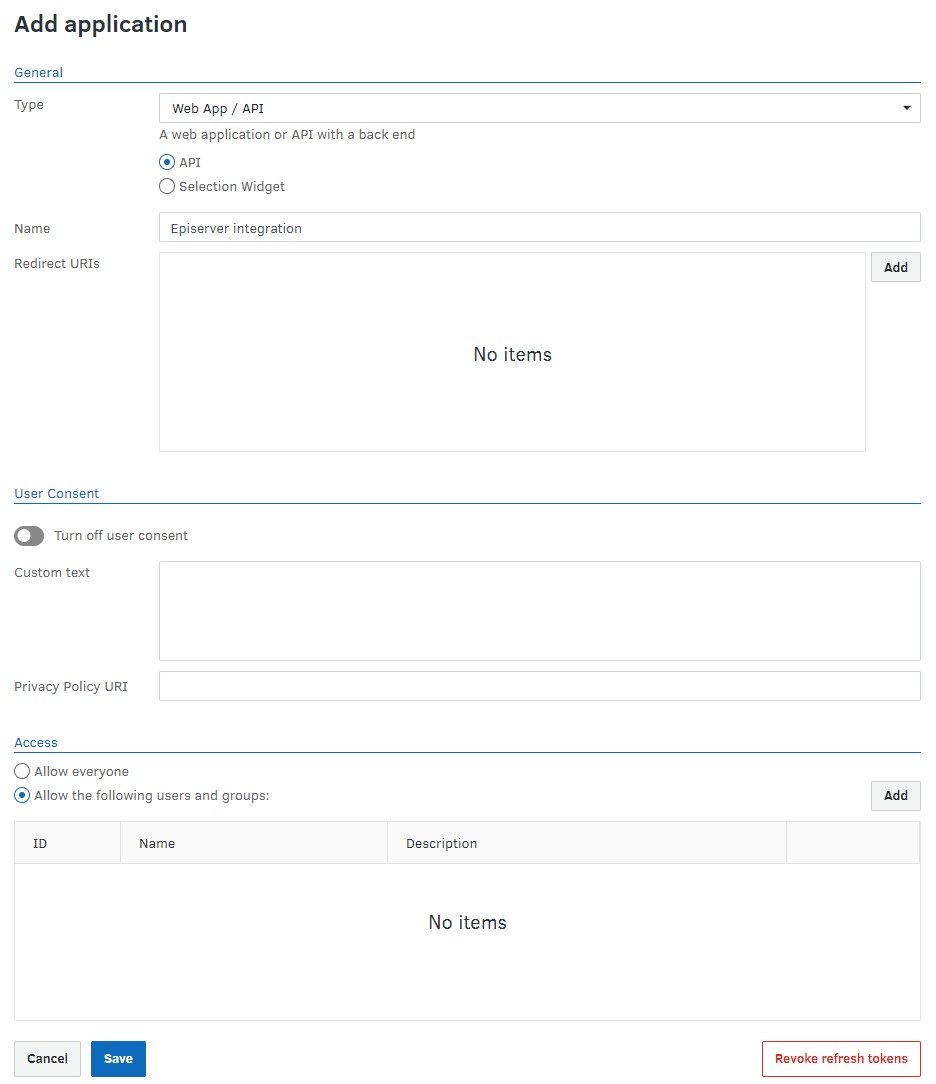
Type: Choose Web App / API. Then, choose API using the radio button below.
Name: Name the application - for example, Episerver integration
Redirect URIs: Here, you set the URI the user should return to after completing authentication. The redirect URI is usually in the form:
http(s)://domain.com/*episerver*/fotoware.plugins.episerver/authentication/callback
Whether or not /episerver is part of the URL depends on how Episerver has been configured. The redirect URI should be set in the Site Configuration settings above. Use small caps. In a multi-site scenario, one URL is needed per domain.
User consent: Use markdown syntax to add any custom information that should be displayed when the user uses the plugin for the first time. It's also possible to include a link to a privacy policy.
Access: This is used to manage who can use the plugin.
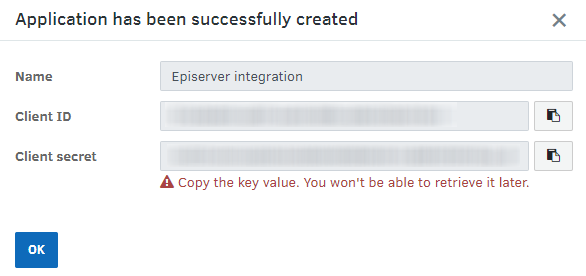
Client ID / Client Secret: These values will be auto-generated when you hit the Save button. See the screenshot below. Copy both values to a temporary location, such as a text file. You later have to add these to the Web.config file of the EpiServer plug-in, in Fotoware:ClientId and Fotoware:ClientSecret value fields. (See web.config section below.)
Once you have done this, you can delete the text file. If you lose the client secret, you can generate a new one and update the Web.config file.
Registering the Server-to-Server integration
Next, you must register a server-to-server authentication to complete the integration. This can be obtained in the Fotoware Site Configuration: Log in to your Fotoware tenant and go to Tools (cogwheel icon) > Site configuration > Integrations > Applications.
Add a new application and set the Type to Non-interactive/script, as seen in the screenshot below.
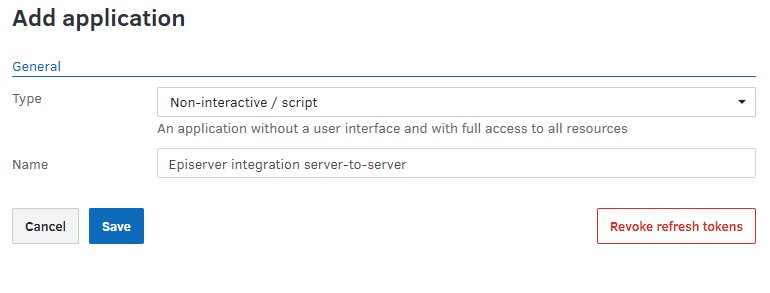
Name the integration and click on Save to generate the Client Id and Client secret values. Copy them to a working document and insert them in the Episerver web.config file in the Fotoware:ServerApi:ClientId and Fotoware:ServerApi:ClientSecret value fields. (See below.)
Episerver Configuration
1. Web.config Application Settings:
<appSettings>
    <!-- all this data to be obtained from FotoWare -->
    <!-- Documentation ClientId and Secret for Selection widget https://learn.fotoware.com/Integrations_and_APIs/Authorizing_applications_using_OAuth/03_Authorizing_a_client_using_OAuth_2.0/02_Native_or_Mobile_Application_authorization -->
        <add key="FotoWare:ClientId" value="[Enter your Fotoware guid]" />
        <add key="FotoWare:ClientSecret" value="[Enter your client secret string]" />
    <!-- Documentation for ServerApi ClientID and Secret https://learn.fotoware.com/Integrations_and_APIs/Authorizing_applications_using_OAuth/03_Authorizing_a_client_using_OAuth_2.0/Non-interactive_application_authorization_with_OAuth_2.0 -->
        <add key="FotoWare:ServerApi:ClientId" value="[Enter your Fotoware guid]" />
        <add key="FotoWare:ServerApi:ClientSecret" value="[Enter your client secret string]" />
    <!-- always https://domain.com/*episerver* + /fotoware.plugins.episerver/authentication/callback  where *episerver* is depending on your configuration. CASE SENSITIVE, so use lower case  -->
        <add key="FotoWare:RedirectUri"  value="[A URL for your solution that needs to be defined in FotoWare. Can be different for different environments]" />
        <add key="FotoWare:TenantUrl" value="https://my.fotoware.cloud" />
    <!-- presets is used to predefine a width of an image to download, can be used with FotoWare:PreferredDownloadWidth. Presets are defined in FotoWare -->
        <add key="FotoWare:PresetUrl" value="/fotoweb/me/presets/export/[your preset's id]" />
    <!-- which asset folder to import images to -->
        <add key="FotoWare:RootFolderId" value="[Enter an id to a media folder in Episerver where you want downloaded assets, for instance 218]" />
    <!-- FotoWare:ApiToken has been removed, pls use ServerApi ClientID and Secret https://learn.fotoware.com/Integrations_and_APIs/001_The_FotoWare_API/FotoWare_API_Overview/API_Authentication_for_non-interactive_clients
        <add key="FotoWare:ApiToken" value="[Enter your API token string]" />-->

    <!-- these are optional -->
        <!-- EnableOnAllImages default is "true" -->
            <!--<add key="FotoWare:EnableOnAllImages" value="false"/>-->
        <!-- ExportWidgetEnableOnAllImages default is "true" -->
            <!--<add key="FotoWare:ExportWidgetEnableOnAllImages" value="false"/>-->

         <!-- Leave empty or remove unless you hav been told otherwise. Domain is not required in Episerver multisite solution,
            example https://domain.com/*episerver*/fotoware.plugins.episerver/authentication/callback
            or /episserver/fotoware.plugins.episerver/authentication/callback
            where *episerver* is depending on your configuration. CASE SENSITIVE, so use LOWER CASE  -->

            <add key="FotoWare:RedirectUri"  value="[A URL for your solution that needs to be defined in FotoWare. Can be different for different environments]" />

         <!-- Optional: how often users need to login to FotoWare, in days. Default value is 14 days -->
            <add key="FotoWare:RefreshToken:ValidDays" value="14" />


        <!-- DisableEpiserverDefaultMediaSelector default is "false" -->
            <!--<add key="FotoWare:DisableEpiserverDefaultMediaSelector" value="true"/>-->

        <!-- <add key="FotoWare:AllowedTypes" value=".jpg,.jpeg,.jpe,.gif,.bmp,.png" />
            <add key="FotoWare:ArchiveUrlsToSynchronize" value="/fotoware/archives/5000-Archive,/fotoware/archives/5000-Archive-2" />
            <add key="FotoWare:PreferredDownloadWidth" value="0" /> --><-- PreferredDownloadWidth is important to be same or less than the preset's width to work, zero is default and will  take the default preset's width -->
It is also possible to implement and register an instance of the IFotoWareSettings (or extended IFotoWareCommerceSettings) interface to take full control of all settings, for instance, configuring which metadata to synchronize.
Also in web.config
Upon installation, the profile store needs to add "FotoWareData", used for storing user-specific Fotoware data. Ensure it is there.
<profile defaultProvider="x">
    <properties>
        <add name="FotoWareData" type="System.String" />
           ...
    </properties>
        ...
</profile>
2. Configuring additional settings
You need to implement the IFotoWareMedia interface on a content type that inherits from Episerver's ImageData class in your solution. This will enable some additional fields which is used by the add-on to keep the assets in sync with the original in Fotoware.
public class ImageFile : ImageData,  IFotoWareMedia
{
    [Editable(false)]
    public virtual string FotoWareUrl { get; set; } //Link back to Fotoware

    [Editable(false)]
    public virtual DateTime FotoWareModifiedDate { get; set; } //for sync job to work
}
The FotoWareModifiedDate property is used to track when the asset was last changed in Fotoware. It should be noted that an update to an asset's metadata in Fotoware adds two seconds to the modified date, and therefore, we need to keep track of this date and time.
3. Add to your Tiny MCE configuration toolbar
The button should be plugged into Tiny MCE automatically. If it doesn't show up, you probably already have a custom configuration. Search for TinyMceInitialization in your solution and add: **fotoware-insert-media** to your toolbar, you may need to put a module dependency to [ModuleDependency(typeof(Fotoware.plugins.Episerver.Tinymce.TinyMceModule))] so that your custom configuration runs last.
4. Decorate your Episerver Property with the Fotoware UIHint
The following code should be added to the Model object in the types of pages where you plan to use the Fotoware add-on.
//FotoWareUiHint.FotoWareImage only for ContentReference type
[UIHint(FotoWareUiHint.FotoWareImage)]
public virtual ContentReference ImageAsContentReference { get; set; }

//FotoWareUiHint.FotoWareImageUrl only for Episerver.Url type
[UIHint(FotoWareUiHint.FotoWareImageUrl)]
public virtual Url ImageAsUrl { get; set; }

[UIHint(FotoWareUiHint.FotoWareXhtmlString)] //Introduced in version 3.5, it is not mandatory, but needed in some solutions
public virtual XhtmlString MainBody { get; set; }
This will replace Episerver's built-in Image editor with an extended one that supports selecting images from Fotoware as well as local Episerver images.
To disable being able to select local images in Episerver you can add another attribute to your property:
*** NOTE: FotowareConfigurationAttribute** is introduced in version 2. ***
`[FotowareConfiguration(DisableDefaultEpiserverMedia = true, ExportWidgetEnabled = WidgetStatus.Disabled, /* only with XhtmlString, will use the export url from fotoware direct, instead of downloading the asset to Episerver */ UseExportUrlOnly = false, QueryParameters = "crop=false&enhance=false&caption=false&action=false&publication=false&behaviour=false")]`
This attribute should be used in combination with FotoWareUiHint. The parameters documented here: Using the widgets
** NOTE: Below parameter is removed in version 2:**
`[UIHint(FotoWareUiHint.DisableDefaultEpiserverMedia)]  //please use FotoWareConfigurationAttribute`
If your solution uses custom **XhtmlStringEditorDescriptor**, please inherit of FotowareXhtmlStringEditorDescriptor instead and always start with base.ModifyMetadata(metadata, attributes);
5. Scheduled jobs
There are two jobs:
Fotoware - Synchronize assets
Normally enabled if you want to sync updates from Fotoware to Episerver. This job will only update assets if it's been updated in Fotoware.
Fotoware - Synchronize assets - Force
Same as above, but will always download the latest image and metadata. Only to be run manually if needed.
You may turn on/off scheduled jobs or run them manually in Admin/config tab/module management/Fotoware.EpiserverAddon/overview in Episerver.
6. Synchronizing metadata from Fotoware to Episerver
The add-on supports synchronizing metadata between Fotoware and Episerver through a mapping schema defined in your interface implementation. Implement your own IFotoWareSettings and define the mapping schema for metadata that you want to get into the Episerver assets. It should be noted that there are some default metadata in Fotoware, but this can be extended for each client.
Note: The export widget will work without a Server API License but will not synchronize metadata; instead, the image will only be downloaded to Episerver.
The default mapping schema is set up as follows:
MetadataConfiguration = new NameValueCollection
{
    {"5", "Name"},
    {"25", "Keywords"},
    {"80", "Photographers"},
    {"116", "Copyright"},
    {"120", "Description"}
};
The mapping schema has keys that match the metadata name in Fotoware, and the value is the property name in Episerver. Note: The types must be the same when changing the configuration; for instance, Photographers is a list of strings.
The following example shows how to add custom metadata to the synchronization:
MetadataConfiguration = new NameValueCollection
{
    {"5", "Name"},
    {"25", "Keywords"},
    {"80", "Photographers"},
    {"116", "Copyright"},
    {"120", "Description"},
    {"998", "EpiserverCustomProp"} // set on imagetype
};
7. Controlling the structure of downloaded assets in Episerver [Optional]
Since Fotoware stores assets in a flat list and Episerver uses a hierarchical structure, assets imported to Episerver are put in a folder structure. This helps when browsing through the imported assets, and it avoids a long list of assets in the same folder, which Episerver does not handle well. It is possible to control how the folder structure for assets in Episerver is structured. By default, folders are created based on the year and month the asset was imported into Episerver, but you can use other structures, for instance, based on metadata in the solution.
This is done by implementing the IFolderResolver interface.
8. Customize Tiny MCE html template [Optional]
You can implement your own input HTML when inserting in Tiny Mce, for example, by filling the alt-text or adding some CSS classes.
This is done by implementing and registering an implementation of IFotoWareTinyMceTemplateResolver where you override GetHtml(ContentReference contentReference, string insertingToContentReference=null)
9. Event handling with Fotoware events
Available events are
- OnImageDownloading: Raised before downloading an asset with the possibility to cancel the action.
- OnImageDownloaded: Raised after the asset has been downloaded.
- OnImageDeleted: Raised in the synchronization job when an asset is deleted or revoked in Fotoware.
Example of how to register event handlers for these events in an IInitializableModule:
public void Initialize(InitializationEngine context)
{
   var events = context.Locate.Advanced.GetInstance<FotoWareEvents>();
   events.OnImageDownloaded += FotoWareHttpClientOnImageDownloaded;
   events.OnImageDownloading += EventsOnOnImageDownloading;
   events.OnImageDeleted += FotoWareHttpClient_FotoWareImageDeleted;
}
10. Disabling Fotoware plugin in Episerver Commerce Asset list
Implement and register IFotoWareCommerceSettings.PreventCommerceEditorIntegration
This is enabled by default.
11. Logging Fotoware.plugins.Episerver
The add-on has some logging information that can be used for information and debugging the integration. Add this to EpiserverLog.config or your log4net config:
<logger name="FotoWare.plugins.Episerver" additivity="true">
  <level value="Info" />
</logger>
12. Extras: Code Samples
In the Nuget package under tools, you'll find some code samples of IFolderResolver, IFotoWareSettings and IFotoWareTinyMceTemplateResolver implementations as well as additional scheduled jobs for synchronization of entire archives from Fotoware.
The additional code is available under this folder after you install the Nuget package:
[Your site root]\packages\Fotoware.plugins.Episerver.1.0.1.0\tools\extras
13. Troubleshooting
Ensure you enable logging (see point 11 above) to troubleshoot the plugin.
14. Multi-site Configuration
Starting with version 3.5, you can have different Fotoware instances for different sites in Episerver. You must implement the IFotoWareConfig interface.
Example: For each site
    public class ExampleFotoWareSite1Config : IFotoWareConfig
    {
        public IFotoWareSettings Settings => new ExampleSiteOneFotoWareSettings();//implement a contrate IFotoWareSettings with all settings

        public Guid SiteId => new Guid("b1c98de6-afbd-433c-bbde-97f873edbb12");//Change this from Episerver / admin / config / websites
    }
It will fallback to the default IFotoWareSettings set globally if siteid is not found.
An example can also be found in Extras/Code Samples above
15. Known issues
- Error message: "An error occurred when sending the request "
This is probably due to the handshake with the endpoint not working. Try to add 'ServicePointManager.SecurityProtocol = SecurityProtocolType.Tls12;' in Global appstart.
Note: The callback URL is case-sensitive. Check your URL. The best practice is to use lower case.
Change log
## 3.7.0.0 - nov 2023
Added download API to svg, pdf, gif, and png, making it possible to download these extensions + transparent png + animated gifs
"AllowedTypes": ".jpg,.jpeg,.jpe,.gif,.bmp,.png,.gif,.psd,.svg,.pdf"
New configs, to disable Export Widgets: <add key="Fotoware:FilesNotOpenInExportApi" value=".svg,.gif,.pdf"/> //default if not set => .png,.svg,.gif,.pdf
## 3.6.0.1 - mar 2022
#4734 [BUG] using widget import not working without export widget enabled
## 3.6.0.0 - may 2021
#3799 Use Export Url direct in WYSIWYG, without downloading the asset in Episerver
## 3.5.0.0 - apr 2021
#3632 Multi-site configuration - you can now have different Fotoware instances per site in Episerver
#2985 Fotoware login token expiry (default 14 days)
## 3.0.0.1 - mar 2021
#3634 [BUG] Cookie is set as httpOnly from web.config <httpCookies httpOnlyCookies="true" requireSSL="true" />,
javascript cant read, popup opens and closes several times
## 3.0.0.0 - nov 2020
[Breaking] Fotoware:ApiToken in appsetting is now removed and replaced with Fotoware:ServerApi:ClientId and Fotoware:ServerApi:ClientSecret.
#1749 Use Oauth server to server API authentication
#2926 You can now run the plugin with Export Widget without Server API License, then the asset is transferred but not the metadata.
## 2.2.0.0 - nov 06, 2020
Last version with Fotoware:ApiToken configuration. Version 3 introduces Oauth server to server authentication
#392 [BUG] Image property is not updated in Episerver. Change the window dialog popup against Episerver javascript modal window.
#2967 [BUG] Server error not showing if custom errorpage is enabled on server
### 2.1.0.0 - June 07, 2020
[BUG] Images like PSD, are saved with psd in name, but should save as export format (jpg)
[BUG] Tinymce is always opening ExportWidget diregarding config
[BUG] TemplateResolver for TinyMce was not triggered
### 2.1.0.0 - June 01, 2020
Images like PSD are saved with psd in name, but should save as export format (jpg)
### 2.0.4.0 - May 15, 2020
Accesstoken not fetched caused loop
Images with åäö not working
cookie login user specific
### 2.0.0.0 - Jan 10, 2020
Support for Export Widget
New - FotowareConfigurationAttribute
### 1.3.0.2 - Oct 20, 2019
Bug fixes and better logging
### 1.0.0.0 - Jun 10, 2019
Initial release