Combining several indexes into one using unions
This topic explains how you can combine several indexes into a single large archive with a single entry point using unions in Index Manager Enterprise. For more information about unions, see How unions work.
To create a union:
- In the Index Manager Settings app, open the Unions tab and select New Union.
General Settings
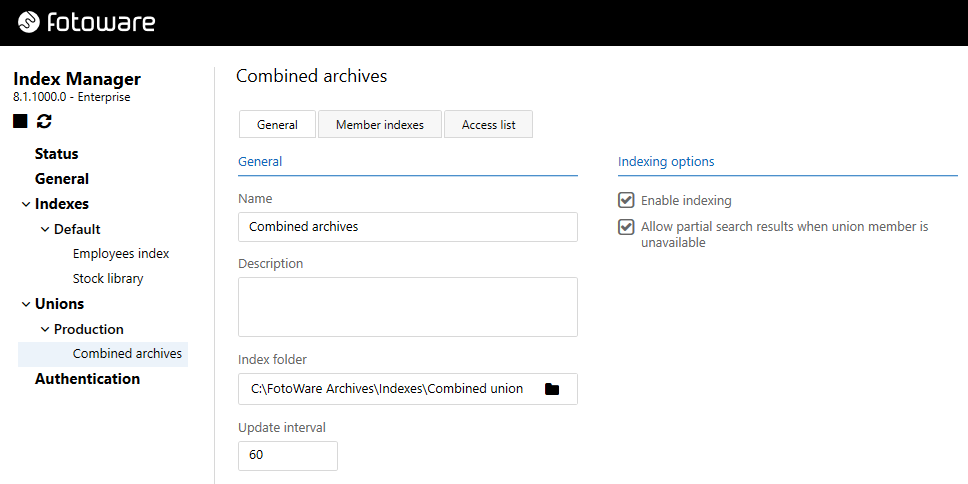
- Enter the following information on the General tab:
Name: Enter a descriptive name for the union. This is the archive name that will be visible to the clients.
Description: Enter a more precise description of the union in this field.
Index Folder: Enter the path to the index folder where the union should be stored. Do not use an existing index, create a new index folder where the union index is placed. Later you will add members to the union, i.e. existing indexes that will be joined together or configured with backup solutions.
Update interval: Choose how often (in seconds) the union should check the connected union members to look for updates:
- Decrease the interval if you would like to check the members for updates more frequently. This is useful if the union members are updated often and you want to make sure that the archive is fully up-to-date. It will, however, increase the network load and the processor load on the union server. If you need to decrease the interval but experience that the union server is getting too slow, try to decrease the browse size for each of the union members.
- Increase the interval if the members should be checked for updates less frequently. This is useful for indexes that rarely change or if the processor load or network load is too high. You can also try to decrease the browse size for each of the union members to reduce the processor load.
A search always returns the newest files and is not affected by this setting. It only applies to browsing the archive. The number of seconds between updates can range from 1 to 1,000.
Indexing options: Enable or disable the union by selecting one of these options. If you are configuring a union that combines several indexes, you can also choose whether you will allow partial search results in the event that one of the attached indexes fails to respond. This may of course return an incomplete search result, but might be a better option than letting the search fail altogether.
Member Indexes
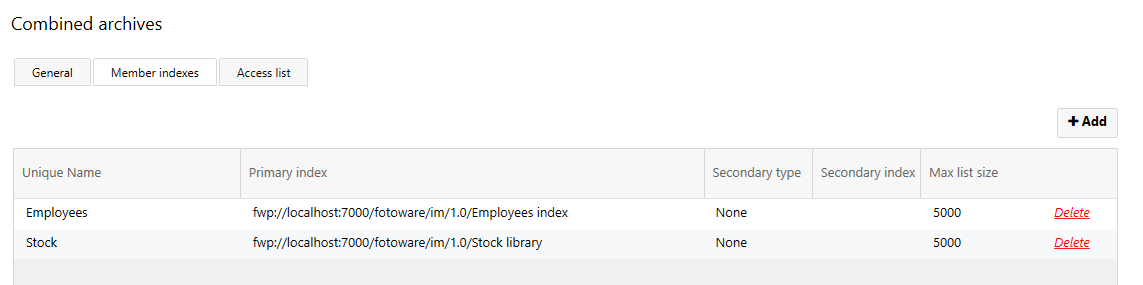
On the Member indexes page, you can add indexes to the union. To combine several indexes in a large archive, add primary members to the union. Select + below the list of indexes to add new indexes to the union. By default, the connection window that opens lists indexes on the local server. However, you can easily connect to indexes on another server by entering that server's hostname. The first time you connect to a remote server, you may have to authenticate. The access credentials are then stored in the local Operations Center Settings (under Server Settings | Authentication) for future use.
A note about making secure connections (SSL)
To connect to an Index Manager server over a secure connection, enter fwps://hostname in the server address field. This will connect to the server using the SSL port number set in the Operations Center Settings, port 7001 by default. It is also possible to establish a secure connection by entering hostname:7001, presuming port 7001 is the port configured for SSL.
When adding a secondary index to the union you can select how you would like the secondary index to operate from the drop-down list. It could work as a backup, a parallel, or a round-robin index. For information on the different types, see Creating a backup index solution using unions.
What's next?
Now you can save the union, or you can define an access list for it. For more information, see Setting access permissions on a union.