Configuring Job Request Files (JRF)
Job Request File settings
In Color Factory Settings, expand the relevant channel and select XML & Job Request Files.
Open the Job Request Files tab.
The following dialog appears.
Job request files (JRF) are special files that instruct Color Factory where to pick up files to process, how to process them, and where to store the output files. This allows integration with third-party software, such as editorial systems, as they can create instruction sets that tell Color Factory to process a batch of files in a certain way.
IMPORTANT: The Job Request File feature must be enabled for Color Factory to process files according to JRF instructions. If the feature has not been enabled, any job request file that is placed in the channel's input will be routed to the Unknown files folder.
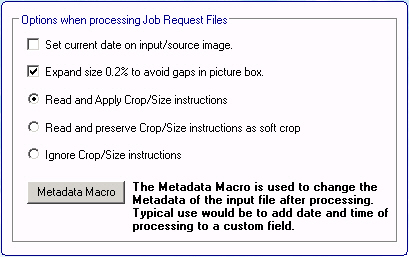
Here, you may set various options related to the processing of files using Fotoware Job Request files.
Set current date on input/source image: Select this option to stamp the processed files with the date and time of processing.
Expand size by 0,2% to avoid gaps in picture box: Select this option for Color Factory to increase the image size marginally to avoid potential gaps between the image and the picture box due to rounding errors in the size calculations.
Ignore Crop and Size commands in JRF file: Select this option for Color Factory to ignore crop and size information in the JRF file and instead apply cropping/sizing according to the channel’s settings. If cropping is not configured in the channel, no cropping will be performed.
A full specification of the Fotoware JRF format can be found here.
Tagging files that have been processed to avoid double-processing
Color Factory can be configured so that when a processing request has been made by an external application through a Job Request File (JRF), the processed file(s) are tagged with a publication date or similar information.
To do so, select Metadata Macro, then Add Field to specify the text information that should be edited. For instance, you can add the date and time of processing to the Release Date field (#030) when the image is processed, provided that the image has not been published before, in which case you may wish to retain the original publishing date.
To accomplish this, choose Field #030 in the Field to Add drop-down box and Replace previous content. In the Field content area, you could, for instance, enter %%INSDATE, in which case the processing date would be filled in. Then, set the condition that must be met for this editing to happen. Select Only if the following condition is met, and choose #030 – Release Date Is Empty.