Creating a metadata view
A metadata view is a collection of metadata fields applied to an archive. The metadata view manages the fields that are in the different FotoWeb user interfaces and plugins and whether they are read-only or editable.
Users can only edit metadata in an archive if they have been given permission to do so in the archive's access list, but at the lowest level, it's the metadata view that controls whether a field is editable at all.
Note: How metadata views affect the uploading of assets to the system
The metadata view that is assigned to an archive also affects the fields users see and are required to fill in when uploading assets to an archive. By setting required fields and, optionally, coupling that field with a taxonomy that has preset values, users will have to fill these fields in when uploading files to the archive. This applies to all means of uploading to FotoWeb: from web browsers, FotoWeb Desktop, Adobe Extensions, and FotoWeb mobile apps.
Creating a metadata view
- From the Tools menu (cogwheel icon), go to Site Configuration > Metadata Views.
- Select Add Metadata View to begin. You can also clone an existing metadata view by selecting Clone for the relevant view.
- On the General tab, enter a Name and a Description in the General settings section.
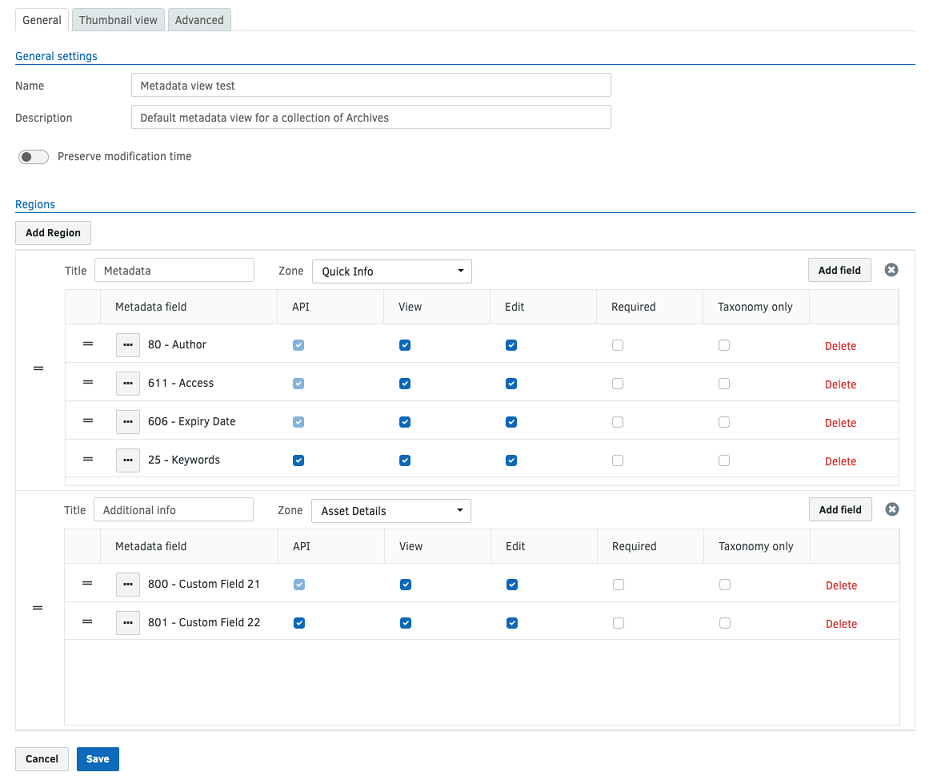
Adding fields
Below Name and Description fields, you can add the fields you'd like to expose in an archive using this metadata view.
Fields that you add here can be assigned to Regions and Zones. These terms are used to describe the areas on the Asset Details page in the web interface where the information is displayed.
A Region is a group of fields with a group header and can contain any number of fields. Each region you create can then be assigned to a Zone. Zones relate specifically to the main FotoWeb interface, where the asset details page has two zones: Quick Info is the zone directly below the asset's title, to the left of the asset preview, while the Asset Details zone is the area that holds the asset's preview and additional information tabs. Assigning a region to the Asset Details zone creates a new tab that contains those metadata fields. The tab will be named according to the region name you chose above.
Note: In the Pro interface, the Region will be used as a group header for the fields it contains. Zones are not in use in the Pro interface but you should still assign a zone to all regions so the metadata view can be used in the main FotoWeb interface.
Creating a region and adding fields to it
- To add a region, scroll to the Regions section and select Add Region.
- Name the region and assign it to the zone.
- Select Add field to choose the fields you want to include.
Field order
Fields will be listed in the order that the regions and individual fields are listed in the metadata view. Both regions and individual fields in a region can be moved up and down using the = icons on each line. Consequently, you can control the tab order when using keyboard navigation with the metadata editors in the various user interfaces (such as the metadata editors in FotoWeb, FotoWeb Pro, and FotoWeb Desktop).
Note: If the metadata configuration is changed so that a metadata view refers to a Field ID that no longer exists in the master metadata configuration, the metadata editor in FotoWeb Pro will refuse to load. See this troubleshooting article to remedy the situation.
Setting field properties
Each field added to a region has several properties associated with it:
API: This lets you manage whether these fields should be exposed through the API to allow other systems to read and modify their contents.
View: Controls whether the user can see the field in the metadata editors in the main and Pro interfaces in FotoWeb.
Edit: Controls whether users can edit the content of the field. If only View is enabled, field content will be exposed but not editable.
Note: Even if a field is editable, a user can only edit the field content if they have Edit text permissions in the archive(s) to which the metadata view is assigned.
Required: Manages whether the field is mandatory or not. If it is, users cannot store the field if left empty. Users who upload files to an archive must fill in the required fields before initiating the upload.
Taxonomy Only: Manages whether text can be input in the field only using content from the associated taxonomy (see below for more information).
Note: Enabling some of these properties may also enable others automatically. For example, if you enable Required, Edit will also be enabled.
Taxonomy-related field properties
When a field with a taxonomy associated with it is added to a metadata view, a user who edits that field can choose from the tags that have been added to the taxonomy.
By default, the user will also have the possibility to add a custom tag that is not in the taxonomy. However, if the system administrator has decided that users should only be allowed to choose from the tags predefined in the taxonomy, they can select Taxonomy Only for the field in the metadata view. Then, users will not be able to type custom tags into the metadata field but will be forced to choose from the tags defined in the taxonomy. For more information about taxonomies, see Creating metadata taxonomies.
Preserving the original dates of uploaded assets
When migrating content to Fotoware, you might want to preserve the original date and time of the assets that are uploaded. You can do so by turning on the Preserve modification time toggle in the metadata set and associating that metadata set with the archive to which files are migrated.
Note: This setting is currently honored only by the web uploader.
Configuring the fields that are used in the Thumbnail view
On the Thumbnail View tab, you can choose which fields to expose in the regular thumbnail grid. Below each thumbnail in the FotoWeb grid, there is a container for metadata split into sections: Label, First line, and Second line. The metadata displayed in these fields can be customized using the drop-down list options, as shown in the example below.
Note: You may need to clear the cache in your web browser after changing the labels to reflect the update.
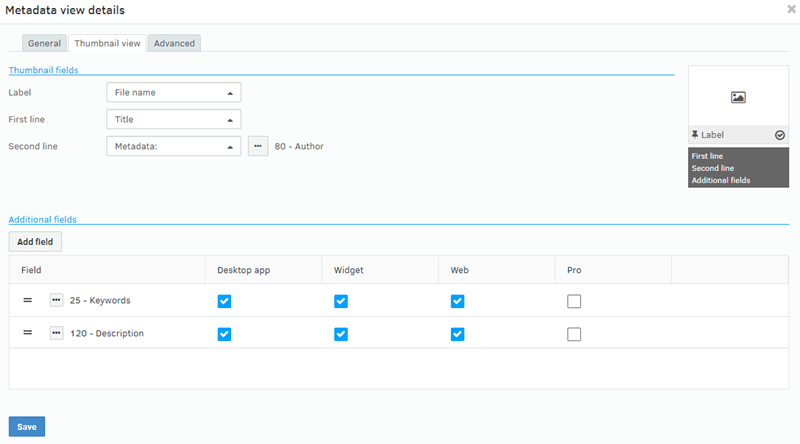
Additional fields
You can also specify additional fields and set the order in which they appear, as well as in which user interfaces they should appear:
Desktop App: Shows the field in the FotoWeb Desktop apps and plugins (Uploader, Office plugins, Adobe Extensions)
Widget: Shows the field in the Selection Widget used in CMS integrations, for example.
Web: Shows the field in the regular FotoWeb user interface in the web browser.
Pro: Shows the field in the FotoWeb Pro user interface in the web browser.
Setting properties for built-in fields
.png?revision=1)
On the Advanced tab, you'll also see the list of Built-in fields. These fields - Title, Description, Tags, Status, Rating, and Notes - are shown in all archives by default.
The three first fields, Title, Description, and Tags, are deemed the minimum required metadata fields in an archive and are always editable for users with metadata editing rights for the archive.
If you do not want users to be able to overwrite information already stored in these fields, you can map them to custom fields other than the standard fields (field numbers 5, 120, 25) using the Browse button next to the field assignment.
Note: The Tags field can only be associated with a bag field to allow multiple entries.
To toggle the visibility of a field, select View/Edit.
To also make a field required, select Required for the specific field.
Tip: By default, the built-in fields are not exposed when uploading files to an archive. To allow users to add information to these fields during upload, add them to the Detail view tab in the Metadata View and then assign the metadata view to the archive.
What's next
When you have created a metadata set, you can assign it to an archive.