Setting up SSO with Microsoft Entra ID
Configuring SSO with Microsoft Entra ID
Note: Always set up a local FotoWeb account as a FotoWeb Administrator with full access to Site Configuration.
This account is needed to log in to your Fotoware site if the application key has expired and/or SSO does not work anymore. You need a local FotoWeb Administrator account to be able to reconfigure SSO to work correctly again.
Adding the Fotoware application to the Azure portal
- Log in to the Azure portal and open Microsoft Entra ID.
- Select Add > App registration.
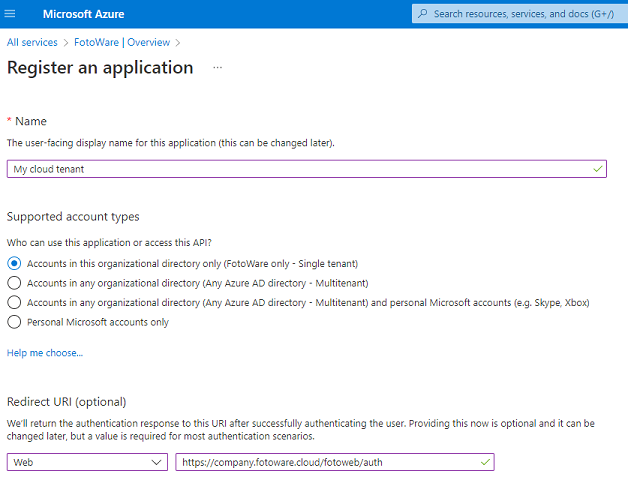
- Enter a name for the application.
- Select Web from the Select a platform drop-down list.
- Select the Redirect URI that your application uses. For single sign-on to a Fotoware site, the URL must have the following format:
https://<site hostname>/fotoweb/auth/signin-oidc
Example: https://contoso.fotoware.cloud/fotoweb/auth/signin-oidc
Alternatively, you can copy the URI (https://internalpreview.fotoware.cloud/fotoweb/auth/signin-oidc) from the Single Sign-on settings for the site (Site Configuration > Security > Single Sign-on).
- Select Register.
Tip: After creating the application registration, open the Overview section for your newly registered application to retrieve the Application ID (see the example below). You need this ID for the Fotoware Microsoft Entra ID configuration in the site configuration later.
Set the correct Redirect URI
Go to Application > Authentication > Redirect URIs and add a new Redirect URI. It should match the Fotoware server's public hostname followed by /fotoweb/auth/signin-oidc, for example, https://hostname.fotoware.cloud/fotoweb/auth/signin-oidc
Next, remove any other original Redirect URL listed.

Note: If you previously enabled implicit grant for ID tokens (in the Authentication section) for Fotoware, we recommend that you now disable this option.
Assign permissions to the application
- Open the API permissions view for your application and select Add a permission.
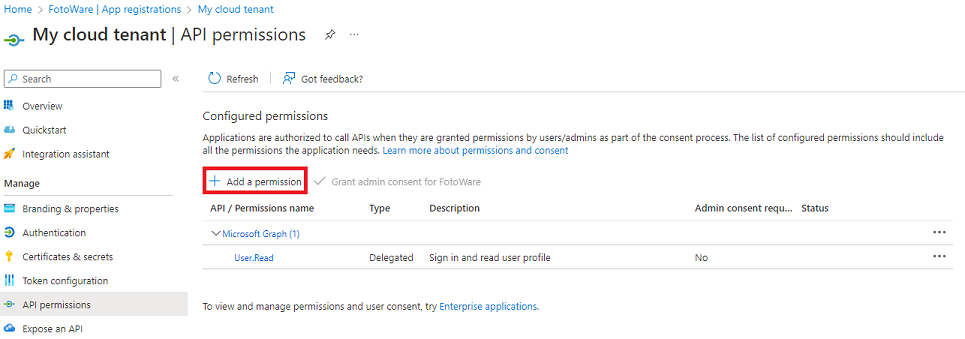
- Use Microsoft Graph and add the User.Read Delegated permission.
When using group-based access control, you must access the directory as the signed-in user (Directory.AccessAsUser.All). This is not necessary if you are only using role-based access control. - Select Save to update the permissions.
Creating the application secret
- Open the Certificates & secrets view for your application. You find this in the same menu as API permissions above or as a link in the Overview section.
- Select New client secret.
- Enter a description (simply a label) in the Description field.
- Select a duration from the Expires drop-down list. For security reasons, a key can be valid for a maximum of two years.
- Select Add to create the client secret. You can then copy it to the clipboard and paste it into the Application key field in the Microsoft Entra ID settings in the Operations Center.
Note: It is the customer's responsibility to replace the application key before it expires. Because the validity of application keys varies, it's practical to set a reminder in your maintenance calendar to replace the key before it expires. If the key does expire, users will temporarily lose access to the system.
Adding Microsoft Entra ID information to the Fotoware Site Configuration
Make sure you have the necessary information from the Azure portal before proceeding:
Application Id - You can find this in the Overview section.
Application Key - The secret generated in the Azure portal.
Authority - This is the URL of the Microsoft Entra ID service. Typically, it is https://login.microsoftonline.com (the global Microsoft Entra ID service), but this can be different when using different authentication providers.
Directory ID - You can find the Directory ID in the Overview section, next to the Application ID.
Microsoft Graph Authority - This is the base URL for Microsoft Graph, used for retrieving user and group information.
Adding the information to the Fotoware tenant in the Site configuration
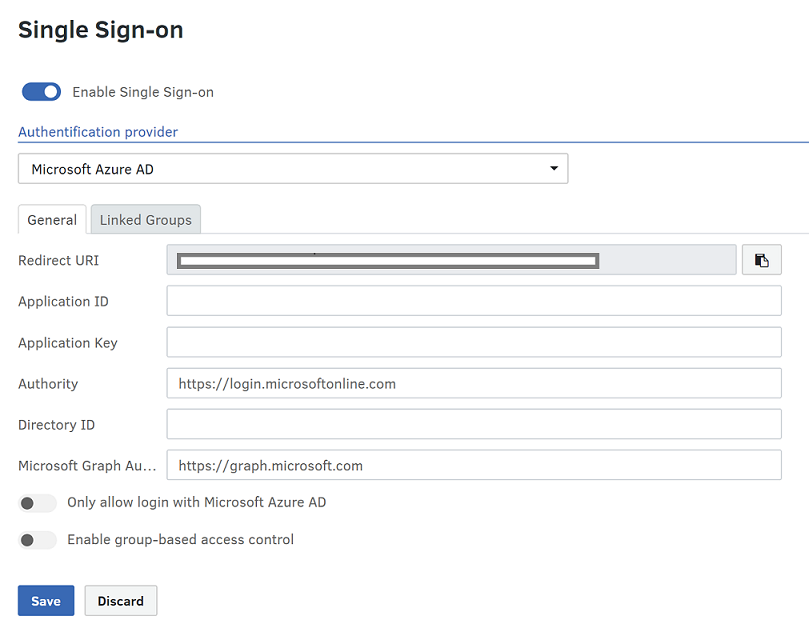
- On the Fotoware site, from the Tools menu (cogwheel icon) go to Site Configuration > Security > Single Sign-on.
- Choose Microsoft Microsoft Entra ID as your authentication provider and enter the Application ID, Application Key (called Client Secret in the Azure portal), Authority, and Directory ID values.
- Select Save.
Importing groups and assigning access
- Next, you can open the Linked Groups tab to select the groups you would like to add to Fotoware.
- Select Add linked group.
- In the dialog that opens, enter a value in the External Group ID field.
- Select a value from the Group Name drop-down list or enter a group name. The group will be created if it does not already exist.
- Select Add to add this group to the Linked Group list. Select Unlink if you need to remove the link to the group.
- Select Save on the Single Sign-on page. You can start using these groups when assigning access to archives and workflows in the system.