FotoWeb Authentication with Active Directory Federation Services (ADFS)
This is the recommended way of connecting FotoWeb to an on-premises Active Directory and allowing users to sign in to FotoWeb with their Active Directory accounts.
Setting up and managing Active Directory and Active Directory Federation Services (ADFS) efficiently and securely can be demanding. This approach is recommended for organizations that already have their own installation of Active Directory and, ideally, ADFS, and intend to keep using it.
Note: Active Directory integration via LDAP in FotoWeb is set to End of Life from January 1st, 2024, and will be removed from our software in a future version. We strongly recommend switching your identity provider as soon as possible.
Fotoware currently supports a variety of other identity providers, such as Microsoft Entra ID (formerly Azure Active Directory), ADFS + SAML, or any other SAML 2.0 compatible provider, such as Okta, OneLogin, and many more.
Contact Fotoware Support or your Fotoware Partner if you need assistance migrating to a new identity provider.
Otherwise, you can use the following alternatives:
-
Rather than using ADFS + SAML authentication, consider using Microsoft Azure Active Directory B2C to synchronize your on-premises AD to Azure AD, then use the Azure AD integration of FotoWeb. For documentation and pricing, see microsoft.com.
- Rather than using your own Active Directory, consider using Microsoft Office 365 and the Azure AD integration of FotoWeb for authentication. This fully cloud-based authentication solution requires only minimal setup and management. For documentation and pricing, see microsoft.com.
While both alternatives may incur additional costs for cloud services, they may be more cost-efficient than managing your own services and servers.
Setting up ADFS
If ADFS has already been set up for your domain, you can skip to the next section. Otherwise, learn how to set up ADFS.
Connecting ADFS to FotoWeb
On the ADFS server:
- Open the ADFS Management console.
- Go to the Trust Relationships node → Relying Party Trusts → Add Relying Party Trust.
- In Select Data Source, choose Enter data about the relying party manually.
- Choose a display name, for example, Fotoware.
- Select AD FS profile.
- Do not add a token encryption certificate.
- In Configure URL, select Enable support for the SAML 2.0 WebSSO protocol.
- In Configure URL, set the service URL to
https://yourtenant.fotoware.cloud/fotoweb/auth/saml20/consume/(remember the final slash). - In Configure Identifiers, add the URL of the FotoWeb tenant as an identifier, for example,
https://yourtenant.fotoware.cloud/fotoweb/(remember the final slash). - Do not configure multi-factor authorization.
- Select Permit all users access to this relying party.
- Finish the wizard.
Editing claim rules
- Select the Relying Party Trust created in the previous step.
- Right click → Edit Claim Rules
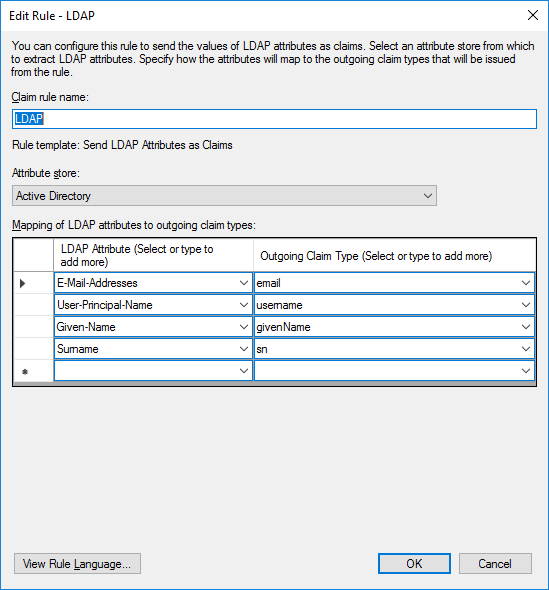
- Add a rule of type Send LDAP Attributes as Claims with the following mappings:
- Attribute Store → Active Directory
- E-Mail-Addresses →
email - Surname →
sn - Given-Name →
givenName - SAM-Account-Name →
username
Claim types shown in monospace, for example,
givenNamemust be entered manually.
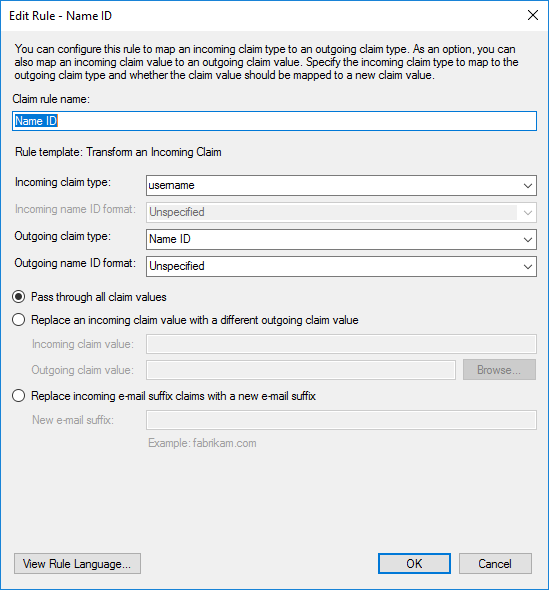
- Add a rule of type Transform an incoming Claim with the following attributes:
- Incoming claim type:
username - Outgoing claim type: Name ID
- Outgoing name ID format: Unspecified
- Select Certificates and double-click the Token-signing certificate.
- In Details, select Copy to File.
- Select Base-64 encoded X.509 (.CER).
- If prompted, do NOT export the private key.
- Select a file name.
- Open the file in a text editor.
- On your FotoWeb tenant, from the Tools menu (cogwheel icon), go to Site Configuration > Security > Single Sign-on.
- Select SAML 2.0 from the Authentication provider drop-down list.
- In the X509 Certificate field, paste the contents of the .CER file exported from the ADFS configuration (previous step).
- In Endpoint URL field, enter
https://youradfsserver/adfs/ls - Add at least one group.
- Save the settings.
Mapping groups
Mapping groups from ADFS to FotoWeb is described in a separate topic.
Testing sign-in with ADFS
Depending on how ADFS is set up, the ADFS server may be accessible only from the internal network in which it resides, whereas FotoWeb may be accessible on the open internet (for example, when using Fotoware SaaS).
- Go to the home page of the FotoWeb tenant.
- In the login form, select Log in with SSO.
- The sign-in page for the ADFS server opens.
- Log in with a user's AD credentials
- You are redirected back to FotoWeb, and you are logged in.