Choosing a server connection in FotoWeb Desktop
Overview
FotoWeb Desktop can be configured to work with more than one FotoWeb server. You can also specify proxy settings for the client/server communication.
Adding a FotoWeb server or modifying server connection settings

Right-click on the FotoWeb Desktop system tray icon (the leftmost blue icon as seen above) and choose Settings... to configure the connection to the FotoWeb server.

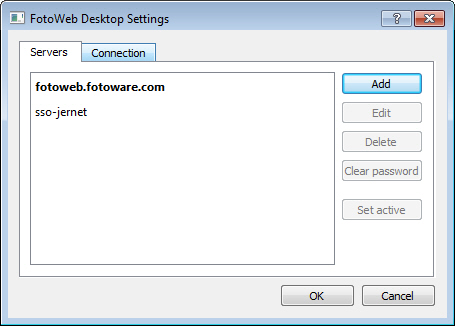
The FotoWeb Desktop settings window opens on the Servers tab, where you can modify the settings for the server connection and optionally add any other FotoWeb servers to which you have access through FotoWeb Desktop.
To add a server, click on the Add button and type in the address to the FotoWeb server. Typically, you only need to type in the servername, since the connection will default to an http connection on port 80. However, if you need to specify an SSL connection, you can type in the full path like this: https://servername. This will attempt a connection at port 443. If you also need to specify the port number you can do so like this: http://servername:portnumber.
To edit a server's address, select it in the list and click on the Edit button. Change the url and press the Enter key to save the changes.
A server connection can also be removed by selecting it and clicking on the Delete button.
Clearing the server password
If you have previously set FotoWeb Desktop to remember your password, you can clear it by selecting the connection in the list and clicking on the Clear Password button. Note that this does not reset you password on the FotoWeb server itself, it only erases your locally stored username and password for logging on to FotoWeb.
Choosing which FotoWeb server to use
If you have configured more than one FotoWeb server, you will need to choose which connection you want FotoWeb Desktop to use by making it active. To make a connection active, simply select it in the list and click on the Set active button.
This setting affects the FotoWeb Uploader, the check in/out feature, the Microsoft Office plugins and the Adobe Extensions.
Configuring proxy settings

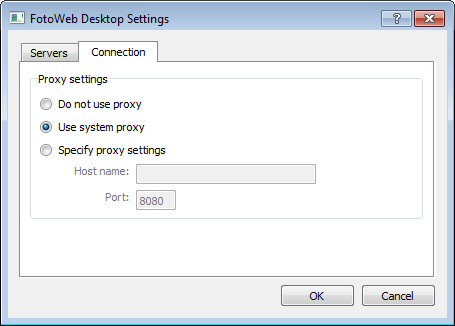
If you need to access the FotoWeb server through a proxy server, you can configure that from the FotoWeb Desktop settings dialog also. If you have not done so, right-click on the FotoWeb Desktop tray icon and choose Settings... and then go to the Proxy tab in the window that opens.
There are three options here:
Do not use proxy - completely disables the use of a proxy.
Use system proxy - Uses the proxy settings configured in the Internet settings in the Control Panel. If no proxy has been set there, FotoWeb Desktop will not use a proxy either.
Specify proxy settings - Choose this option if you want to define the proxy settings manually, then type in the host name and port number for communications with the proxy server.
Important: If FotoWeb Desktop is configured to use a System proxy and you change the Windows or Mac proxy setting in the control panel/preferences you will need to restart FotoWeb Desktop to make it use the new proxy: Right-click on the FotoWeb Desktop icon in the System Tray (or Ctrl-click the FotoWeb Desktop icon in the Mac OS Dock) and close the application. Then restart FotoWeb Desktop, for example by double-clicking on the Upload to FotoWeb shortcut on your desktop (on the Mac, start it from your Applications folder).
