Uploading files with FotoWeb Desktop
Uploading files using FotoWeb Desktop
FotoWeb Desktop is an application that is installed on your local computer and allows communication with the remote FotoWeb system. The upload module in FotoWeb Desktop will let you upload files from your desktop directly to any archive that you have upload permissions to. You can also modify the files' metadata before uploading.
You will be prompted to install the software when logging on to FotoWeb, assuming you have been given rights to any of the FotoWeb Desktop functionality in any of your accessible archives.
When installed, FotoWeb Desktop will show up in the system tray in Windows and in the status menu in Mac OS.
There is currently a 2 GB upload file size limit when using FotoWeb Desktop to upload to a Fotoware SaaS site.
Starting the uploader
When FotoWeb Desktop has been installed on your computer, there are two ways to start the uploader.
![]()
The easiest way is to double-click the Drop Files to FotoWeb shortcut on your desktop (Windows only). You can also drop files directly onto this shortcut to add them to the upload queue.
An alternative way to start the uploader is to right-click the FotoWeb Desktop system tray icon and choose Upload.
On a Mac, open the FotoWeb Desktop menu in the status menu (the first icon shown in the screenshot) and choose Upload to FotoWeb...

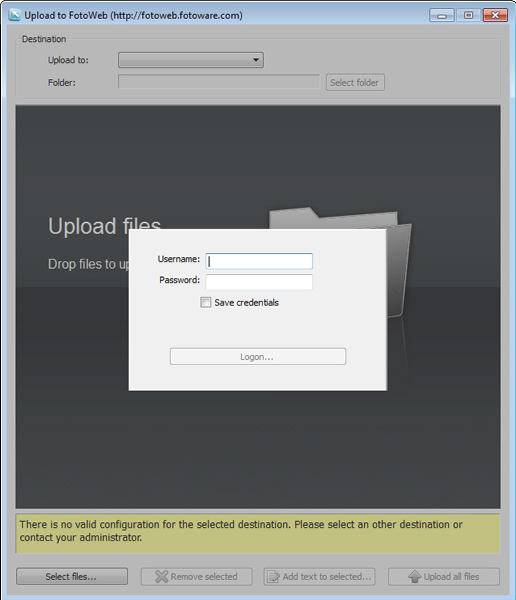
When the uploader starts, you will need to supply your credentials to log on to the FotoWeb server and retrieve your archives. Just enter your FotoWeb user name and password and click OK.
If you want to, you can store the login credentials so you won't have to type them in every time.
After you log in, FotoWeb Desktop will download the server configuration and show you the Upload window.
Adding files to the upload queue
After you have authenticated, you can drag files from your desktop and drop them onto the uploader, or you can click on the Select files button to open the folder browser and choose one or more files that way. As mentioned above, you can also add files to the upload queue simply by selecting them in the Windows Explorer and dragging them onto the Drop files to FotoWeb icon on the desktop.
Important: While you can drop an entire folder onto the upload window to add the files in it to the upload queue, the uploader will not recursively add the contents of subfolders within that folder to the upload queue.
Choosing the archive to upload the files to

The drop down list above the file list lets you choose the archive to upload the files to. The contents of this list will reflect the archives to which you have been granted upload access through the FotoWeb configuration. Your choice of upload archive will also determine which metadata editor you will be using for captioning the files before uploading.
If the archive contains several folders, you will be required to choose which folder you want to store the files in. Click on the Select folder button below the Upload to list to choose the destination folder. You may also create a new subfolder inside the archive where your files will be stored. Note that if the archive you have consists of several folders or has subfolders, you must explicitly set an upload folder before you can proceed to upload the files.
Editing metadata
When files have been added to the upload queue you can edit the metadata of the files one by one by clicking on the Metadata button next to each file. If you would like to edit the metadata of a number of files in a single operation, you can select them in the list (multi-select files using the Ctrl-key) and then click on the Add text to selected... button. Note that when adding metadata to a number of files this way, any information that you add in the editor will be appended to text that is already stored in the files. Thus, no information is lost.
Note that you may be required to fill in certain metadata fields before you can upload files to the archive. This requirement can be set on the FotoWeb server to ensure that the files that are uploaded there contain sufficient information to be retrieved later. Fields that you are required to fill in are marked with a yellow background in the metadata editor. The layout of the editor may also vary depending on the archive you upload to. These settings are configured on the FotoWeb server.
Note: When adding text to files, the text is only added to the copy that is uploaded to FotoWeb. Text will not be stored in the original file on your local drive.
Starting the upload
When you have added files to the queue, chosen a destination archive and optionally edited the files' metadata, click on the Upload button to start uploading the files. After the upload completes, a success message is displayed and you can choose between uploading more files or closing the uploader.
Tip: As an administrator you can make sure that all pictures uploaded to FotoWeb are converted to JPEG format on the client side before they are transferred.