Running basic system usage reports (deprecated)
Note: The FotoWeb Reports module/Fotoware Custom Report Generator tool is deprecated and will be set to End of Life on April 1st, 2024.
Overview
This topic deals with the Standard reports in FotoWeb - Royalties, Sales, Searches, and Uploads.
Accessing the Reports module
To access the Reports module, open the FotoWeb Reports app and choose the FotoWeb site you want to configure.
Select the Reports tab to open the reports screen where you can customize, schedule, and run system usage reports.

Standard reports
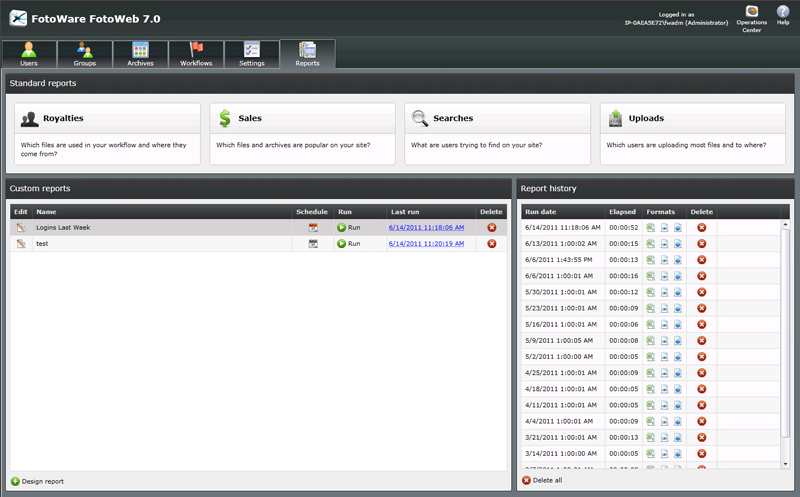
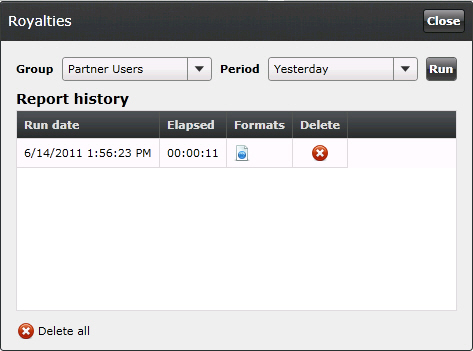
FotoWeb comes with four standard reports: Royalties, Sales, Searches,and Uploads. These are listed at the top of the Reports screen. Select a standard report to display the report history and access the option to download any of the previously run reports.
- Royalties report - helps you see which files are used in your workflow and where they originate. It can be very useful in paying your content sources based on usage.
- Sales report - gives you specific information about which files your users download or use in a workflow, and can be used for charging your users for the files they request. It also tells you which of your content providers are most sought after measured by the number of downloads.
- Searches - monitors search activity and provides statistics on the most popular searches and, not least, the most popular searches that did not return any hits. This could be an aid in tagging your files differently to provide better, more accurate results.
- Uploads report - helps you see to which archives users upload most filesthe and which users are most actively contributing to your archives.
Note: Standard reports cannot be scheduled, and they only output data in HTML format. Therefore, if you need to create reports from which you can export data to an accounting system, for example, you will need to create a custom report.
Running a standard report

To run the standard reports, select the title header to open a separate window with information about the report. Then, choose a group to include in the report and the time span to use as the basis for the report. You can select All to include all events since logging started, but you would typically want to use Last Month, Last week, or another alternative that generates a smaller report.
All reports that have been run previously are kept in the list so that you can open them and compare the statistics of the newest report with the older ones, for example.
As mentioned above, the standard reports cannot be scheduled and only generate output in HTML format. To create a report with the same content as the standard reports but with data that can be exported, you need to design a custom report with the same content.
System events used in standard reports
The Source, Byline, and Object Name fields are used in the standard reports. Consequently, logging of these fields is enabled by default. While it is technically possible to disable the logging of these fields, we strongly advise against it since doing so will render the standard reports useless.
Tip: For information on choosing system activity and metadata fields to allow the creation of more complex custom reports, see Choosing system activity and metadata fields to log for use in your reports.
What about custom reports?
In addition to the standard reports, you can create your own custom reports and filter the data as you prefer. The data from these reports can be output in CSV, XML, and HTML formats. CSV and XML are particularly useful if you need to export the data to an external system, for instance for invoicing purposes.
For more information about custom reports, see Creating custom reports.
When a report has been made, you can schedule it to run at a given date and time by selecting the calendar icon in the list, or you can run the report immediately by selecting Run. As you can see in the example at the top of this article, the calendar icon for the Logins Last Week report is red to indicate that a schedule has been set for that report. Gray calendar icons indicate that no schedule is active for the report.
To run a custom report on demand, select the green Run icon. This triggers the execution of the report immediately.
Select the Last run date to open the most recent report in HTML format in the browser.
To edit the content of a report, select the Edit icon to the far left in the Custom reports list.
Report history
The Report history section displays a log of when the currently selected custom report in the left panel were last run and the time they took. It also has download links for the report data in CSV, XML, and HTM formats so you can export the data to an accounting system, for example.
To see the report history of the standard reports, select either standard report to open a separate dialog with that report's entire history.
