An overview of the Connect configuration
Connect overview
After installation on the server, Connect is configured using Connect Settings which can be found on the desktop or on the Start menu.
Members of the Fotoware Operators group can start and stop the Connect service, while you must be a member of the Fotoware Administrators group to make changes to the Connect configuration.
Status
This is the home screen where Connect displays all its channels and any activity on these.
Service actions
You can start, stop, and restart the Connect service using the service action icons  .
.
When you stop the service, all file transfers stop and may affect your workflow. We recommend only stopping/maintaining the service at non-critical hours.
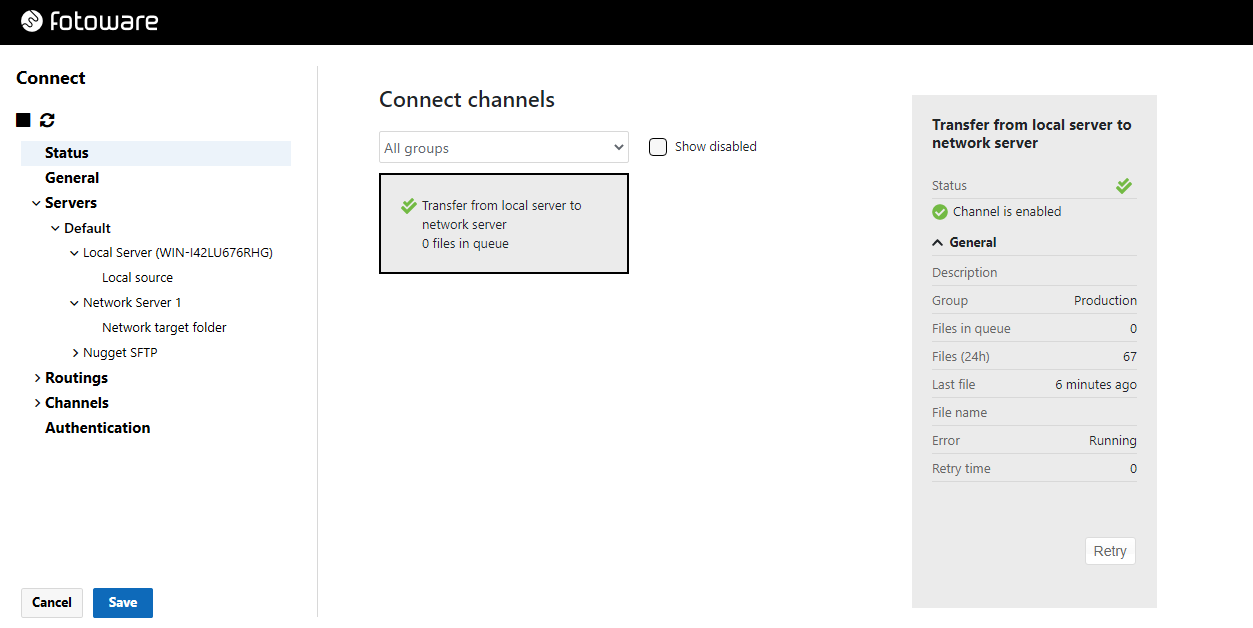
Information in the channel grid
The channel grid displays all the channels that are configured on the server. From here you can read out the channel name, the number of files currently in the transfer queue, and the last file processed in the channel. Use the group filter to select which channel groups to display. To include channels that have been disabled, select Show disabled.
The channels light up when there is activity to make it easy to monitor server activity. A failing channel turns red. When an error occurs, you can find more information about the error by selecting the channel in question and checking the Status field in the channel information panel on the right.
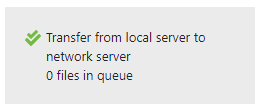
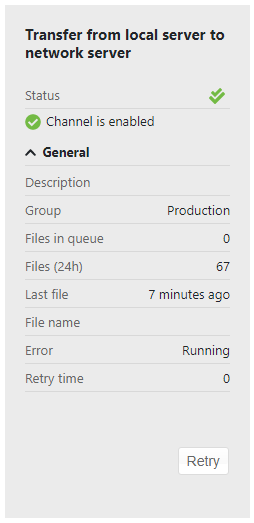
Channel information panel
For more information about each channel, select it to display more detailed information in the information panel on the right.
The Status field indicates whether a channel is running or stopped, and displays error messages if failures occur attempting a file transfer. You can start or stop the channel by flicking the I-O switch below the status readout.
Under General you find the number of files in the queue, the number of files transferred in the last 24 hours, and a graph to indicate the peak hours during the day.
Select Retry to instantly make Connect poll the channel's input folder and transfer any files that are in there. This process is normally carried out automatically - if a channel fails Connect will retry at certain intervals - but selecting Retry forces Connect to try resuming the transfers immediately.
Servers
The Servers view is used for configuring sources and destinations.
There are some benefits to configuring servers separately from the actual processing channels:
- When you configure a server, you choose the type of protocol to use when connecting to it and the folders on the server where the files should be transferred to/from. The folders can be input (source), output (destination), or both for two-way communication. When configuring channels later, you can easily select input and output for your channels.
- If a change in the configuration requires you to change the placement of the input and output folders you do not need to make any modifications to the channels. Simply updating the input and output folders in the Servers view automatically updates the associated channels.
Routings
The Routings view is used to set up routing rules that can be independently associated with a channel. Files can be routed by filename prefix (with an optional subfolder association table), folder size (maximum number of files or megabytes in each subfolder), or file type extension (also with an optional subfolder association table).
Channels
Having set up the input and output folder routings, you set up the processing channels here. Select input and output folders from the pre-configured servers and select an associated routing method, if necessary.
Service options
In this area, you set up service-specific options such as virus scanner preferences.
What's next?
After configuration, you may want to configure a workflow.