Move file sub action
Use this sub action to create workflows that move files between folders or servers.
Settings
The Move file sub action is probably one of the most frequently used sub actions. It offers the possibility to move file(s) to a predefined folder, or to a folder selected manually. In addition this sub action offers customization of several parameters to ensure correct file flow.
Dialog Type
When creating a Move file sub action, you can choose between five different levels of user interaction:
Do not show dialog: Use this option if you only want to copy files into the folder specified in the Destination folder field. The user will not be given any additional options.
Select destination folder: Use this option if you would like the user to choose the folder that the file(s) should be copied to. The user will not be given any additional options.
Standard save file dialog: Use this option if you want the system’s standard dialog box for saving files to open when the user drops the file(s). This makes it possible to both choose a destination folder and a new file name.
Show file name dialog: Use this option if you would like the user to be able to choose a file name for each file or to add an incrementing number to the files if several files are being copied. The user will also be able to verify, but not change, the destination folder specified in the Destination folder field.
Show all features dialog: Use this option if you would like more customization than the previous four options above provide. This option gives you the possibility to configure the dialog that the user sees when using this sub action, so that you can include precisely the information you would like.
Basic Move Settings
This sub action provides several basic move settings. Depending on the dialog type you selected, one or more of these settings may be disabled. If you would like to activate a disabled setting, you must select a different dialog type.
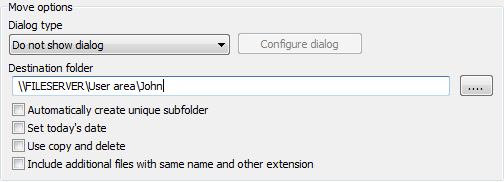
Destination Folder: Select the destination folder for the file(s) you would like to move. You can enter the path directly into the field or click on the browse button to locate the folder.
Automatically Create a Unique Subfolder: Select this option if you would like FotoStation to create a unique subfolder within the chosen destination folder.
Set Today’s Date: Normally when moving a file, the file will retain its original file date after it has been moved. If you would like the file to get the current date, select this checkbox.
Use Copy and Delete: When this option is selected, FotoStation will copy the file to its new location and then delete the original file. The result is the same as when using a regular move operation, with one key difference: When moving a file, its original permissions are preserved, while if you copy it, it will inherit file system permissions from the destination folder. This is an important distinction that may affect how you choose to move files.
Include Additional Files With Same Name and Other Extension: Select this option if you would like FotoStation to also move any files that have the same filename as the file being moved using the action, but which has a different file extension.
This is useful if, for example, you are storing image metadata in a separate file. (Please note that since FotoStation automatically handles normal file operations such as copying, moving, deleting, etc. for metadata stored in an XMP sidecar file, you will not have to use this option for normal XMP metadata.) If the original image file’s filename is for example image01.jpg, then that file’s metadata might be stored in the sidecar file image01.txt. This means that if you would like to move the image file to a different folder and also keep that file’s metadata, this option should be selected. FotoStation will then also move the image01.txt file to the new location.
Customizing the Move File Dialog
When working with the Move file sub action, you can customize the Move file dialog shown to the user when accessing this sub action. Configuring the dialog is quite complex, so make sure that you understand how this option works. When you are done configuring the dialog, run some test files through the action to make sure that the action is configured in the way you meant it to be.
To be able to configure the Move file dialog, select the Move file sub action from the Select action type list. Then select Show all features dialog as Dialog type and click on the Configure dialog button. Select the desired option(s) in the window that opens. The options are as follows:
Show Subfolder Tree
When this option is enabled, the user can expand the destination folder (set in the Move file sub action configuration window) and choose a subfolder within the destination folder to move the file(s) to.
Show Prefix Controls
Select this option if you would like to enable prefix controls to be able to add a prefix to the filename of the moved file(s). Select a predefined prefix from the dropdown list. If the prefix file selected is not exactly what you are looking for, you can choose to edit the prefix file (select the prefix file from the dropdown list, and click on the Edit button) or you can choose to create a new prefix file (click on the New button).
A prefix file can either have a column view or it can have an hierarchical view. When you click on theNew button to create a new prefix file, a window will open where you must enter a name for the prefix file and choose between the two different views. Click on the OK button when you are done.
FotoStation will open a template with an example of the view type you selected, so that you can better understand the structure of these prefix files. The layout of the prefix text file will vary depending on whether you choose column or hierarchical view, but in either case you will be given a sample template that you can modify to suit your needs.
- Hierarchical View: The hierarchical view contains superior and subordinate prefixes arranged in a tree that can be expanded. By choosing a prefix far down in the tree, this prefix and all superior prefixes will be added to the filename.
- Column View: The column view gives you access to up to three columns containing prefixes that can be combined. For each column, the end user can choose to select an entry from the dropdown list or enter text directly into the field.
Separator: Choose a separator from the Separator dropdown list. You can choose between No separator, Underscore, and Dash, or you can simply enter a separator of your choice into the field.
Save Changes to a Temporary File ...
Select this option to make sure that other applications monitoring the output folder (such as Fotoware Color Factory) don’t pick up and start processing a file before the Move file sub action has added metadata to the file.
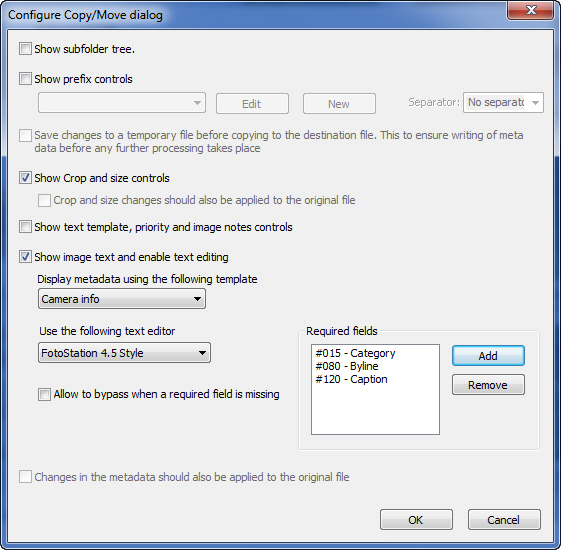
Show Crop and Size Controls
By enabling this option, FotoStation displays the Crop dialog so that you may crop images before they are moved to the destination folder. If you would also like to apply crop changes to the original file being copied, you must select the checkbox labeled Crop and size changes should also be applied to the original file.
Show Text Template, Status and Image Notes Controls
If you want the user to be able to apply a text template, change the status settings of the file(s), or edit image notes for the file(s) being moved, select this checkbox. These options will then be included in the Move file dialog when the user runs the action.
Show Image Text and Enable Text Editing
To view the metadata (text) in the files you are copying, select this checkbox. This way you can verify that the files contain the necessary amount of text and, if needed, make changes to the text. Select the template you want to use when displaying the metadata from the Display IPTC text using the following template dropdown list. Select a text editor from the Use the following text editor dropdown list. This text editor will be used if you would like to view or change the metadata. The user will have to click on the Text button to open the selected editor for viewing and/or changing the metadata.
Required Fields: This option is used to check if text has been entered into one or more specified metadata field(s). It may for instance be used before an image is archived to make sure that information has been added to selected fields. This is necessary if you at a later state would like to search for metadata that has been entered into this field. Use the Add and Remove buttons to choose which fields you wish to make required. Then, when the action is executed, FotoStation will highlight any empty required fields to make them easier to see and fill in.
Allow to Bypass When a Required Field is Missing: If you would like the users to be able to continue with the Move file sub action even if one or more required fields are empty, you should select the checkbox Allow to bypass when a required filed is missing. If this checkbox is not selected, you may discover that you have to abort the entire action because you can’t or won’t add metadata to the required fields.