Table of Contents
Example: Creating a taxonomy for a collection of cars
This article aims to help you understand the value of taxonomies by applying it to an archive that contains a collection of cars.

30. April 2025
Table of Contents
At the outset, we have a FotoWeb archive containing pictures of cars from different manufacturers. We will use custom-made fields for tagging these pictures using labels we define in the associated taxonomies.
Before you begin, you must use the Metadata Configuration tool to create these fields:
| Field name | Field number (may be different in your configuration) | Field values |
|---|---|---|
| Model year | 500 | 2010, 2011, 2012, 2013, 2014, 2015 and so on |
| Make | 501 | A-class, C-class, E-class, A1, A3, A4, A5, A6, A7 |
| Number of doors | 502 | 2, 4-5 |
| Engine | 503 | 4-cylinder, 6-cylinder, 8-cylinder |
| Paint color | 504 | White, Black, Blue, Gray, Red, Silver, etc. |
Enable taxonomies for the fields
- From the Tools menu (cogwheel icon), go to Site Configuration > Metadata > Metadata Setup.
- Select the Taxonomy checkbox for all the above fields and enter a Plural Name for each field. The plural name will be used as the taxonomy's header in the user interface.

Enable taxonomy navigation in the archive
- From the Tools menu (cogwheel icon), go to Site Configuration > Archives.
- Open the General tab.
- In the Navigation Pane section, turn on the Taxonomy navigation toggle and choose the fields you want to expose in the archive - the five field names mentioned above (not displayed in the example below).
.png)
Create taxonomy content
- Log in to FotoWeb and access the Car collection archive to create content for the taxonomies. The logged-in user must have Manage taxonomy privileges to edit taxonomy content.
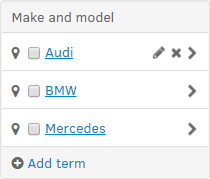
- The taxonomies show to the left of the thumbnail grid, and all are currently empty. Select Add term to start adding terms to the taxonomy.
| Model years | Number of doors | Bodystyles | Engine | Paint colors |
|---|---|---|---|---|
| 2011 | 2 | Convertible | 4-cylinder | Black |
| 2012 | 4-5 | Coupe | 6-cylinder | Blue |
| 2013 | Wagon | 8-cylinder | Copper | |
| 2014 | Sedan | Gray | ||
| 2015 | Hatchback | Red | ||
| Silver | Silver | |||
| White | White |
The above taxonomies all have only one level. However, the Make taxonomy is a little different. At the top level, it contains the manufacturer, with model names at the second level, as such:
- Audi
- A1
- A3
- A4
- A5
- A6
- A7
- A8
- Mercedes-Benz
- A-class
- C-class
- E-class
- S-class
- BMW
- 1-series
- 3-series
- 5-series
- 7-series
Since the Make field can only store one value, we will store only model information in that field. Select the manufacturer node (Audi, for example) at the higher level to display the content of all child nodes inside that node (i.e., model names: A1, A3, A4, and so on) even though the term Audi is not written in the file's metadata. In reality, the taxonomy contains the information that Audi is a parent of A1, A2, A3, and so on, even though Audi, BMW, and Mercedes don't exist in the actual XMP metadata in the file.
First level:

Second level (reachable by clicking > in the navigation):

Customizing the Make taxonomy
The values in the taxonomy will also be used when tagging the files in the archive. By default, new entries in a taxonomy will be exposed in metadata editors that incorporate the field in question. Since we don't want users to be able to set Audi, BMW, or Mercedes in the Makefield (instead, we want them to set the model: A1, C-class, 3-series), we need to edit the properties of the Audi, Mercedes, and BMW nodes:
- Click on the Pen icon next to the Audi node.
This opens the taxonomy item editor, where you can set the ACL for the item.
You want to remove the Set usage permission to prevent users from selecting this node when inputting metadata in a field. Do this for the Audi, BMW, Mercedes, and any other nodes you add for car makes at this level of the hierarchy.
The nodes will still have the Query usage permission, allowing users to select them and display assets from all the child nodes. For example, when a user selects Audi, FotoWeb displays all Audi models.
.png)
Tagging the files in the archive
Now that the taxonomy has been created, it's time to tag the files in the archive.
Before doing so, you must create a metadata set containing the fields you want to expose to archive users. The metadata set is also used to control how the different fields behave. For example, you can create a metadata set with the same fields you have in the taxonomy and dictate that users can only select metadata tags from those you have predefined in the taxonomy you just made.
Creating a metadata set for the car collection
- From the Tools menu (cogwheel icon), go to Site Configuration > Metadata > Metadata Views.
- Select Add Metadata View.
- Select Add Region to create a region to accommodate the fields that will be used to add tags to the assets in the archive.
- Enter Car info in the Title field and select Quick info from the Zone drop-down list. This means it will be displayed in the column to the left of the asset preview on the asset details page.
- Select Add field to add the Model, Year, and Make,
- The Edit permission allows editing of the field - this still stipulates that the logged-in user has Edit metadata permissions on the archive.
- Required means that the field has to be filled in. It cannot be left empty.
- Taxonomy only means that users may only choose from taxonomy values when adding metadata to the field. If this option is not selected, users can choose tags from the associated taxonomy or enter their own keywords.
Assigning the metadata set to the archive
Having created the metadata view, you need to assign it to the Car collection archive:
- From the Tools menu (cogwheel icon), go to Site Configuration > Archives.
- Select Edit for the Car collection archive.
- On the General tab, in the Metadata management section, select Car collection from the Metadata view drop-down list.
- Select OK to save the changes.
Adding metadata from the taxonomy
When users open the Asset Details page (clicking on a thumbnail in the grid) to edit metadata, they can click on the new fields in the editor and choose from the values you defined in the taxonomy. When adding content to the Make field, you will see that you're only able to add model names, not the car makes, because the Set permission was disabled for the taxonomy's top level:

The result
