Installing a separate security certificate from a trusted source
Installing and using another certificate from a trusted source
When accessing the Operations Center Status app on a secure connection with a self-signed certificate (by typing in https://servername:7001 in your web browser's address field) your browser will display a warning that the certificate is not trusted. That's because it is self-signed and not issued by a trusted certificate provider. However, you can safely proceed to configure the Operations Center Status knowing that all traffic is transferred on a secure connection.
If you want to use a site certificate from a trusted source, you can do so by purchasing one from a trusted supplier.
After your certificate has been delivered it is typically stored on your computer. You then have to bind the certificate to port 7001 on your server. But if Fotoware has already created a self-signed certificate and bound it to port 7001, you need to unbind that certificate from the port and then bind the new, purchased, trusted certificate to port 7001.
The procedure for doing this is described below.
Checking if a self-signed certificate is tied to port 7001
Note: Before proceeding, make sure you stop the Operations Center service on the server.
Open the command prompt on your server. (Start | Run cmd) Then proceed as outlined below:
netsh http show sslcert
This lists any SSL certificate bindings. If you find an entry named IP:Port 0.0.0.0:7001 that means a certificate (most likely the Fotoware self-signed one) is bound to port 7001. You must delete this binding before you can bind your purchased, trusted certificate to port 7001.
Note: If no bindings are listed, proceed to Binding your trusted certificate to port 7001.
Deleting the self-signed certificate's binding to port 7001
In the terminal, enter the following to delete the certificate's binding to port 7001:
netsh http delete sslcert ipport=0.0.0.0:7001
Binding your trusted certificate to port 7001
Before you can bind your new certificate to the port, you need to locate its thumbprint in Microsoft Management Console.
- Open the Start menu and click Run, then type in MMC.
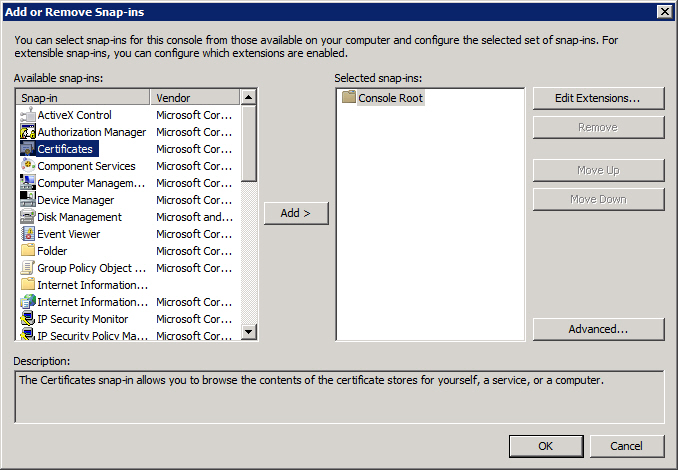
- Open the File menu and choose Add/Remove Snap-in:

- Select Certificates and select Add button.
- Select Computer Account and select Next.
- Choose Local computer (assuming the signed certificate was stored on the local computer) and click on Finish.
- Select OK to close the Snap-In manager.
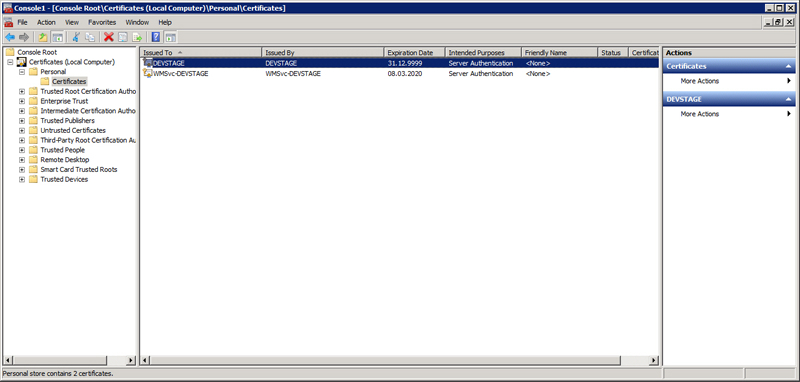
- Expand the Certificates (Local Computer) node, then the Personal node, and then select the Certificates node:

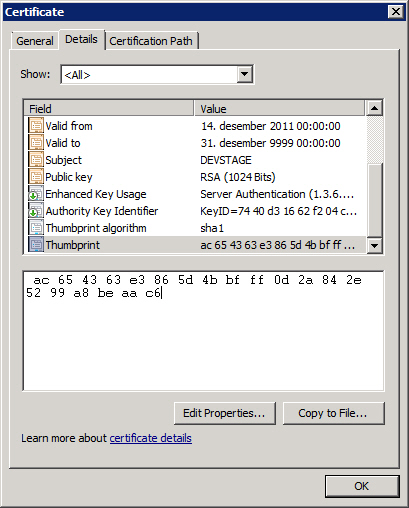
- Double-click on the signed certificate to open its properties and open the Details tab.
- Scroll down to the Thumbprint property and copy the thumbprint hash to the clipboard. You will need this thumbprint to create a port binding in the next step, but you will have to remove the spaces between the values. We recommend pasting the string into Notepad, for example, to remove the spaces.

- Open the command prompt and type in the command below.
netsh http add sslcert ipport=0.0.0.0:7001 certhash=0000000000003ed9cd0c315bbb6dc1c08da5e6 appid={00112233-4455-6677-8899-AABBCCDDEEFF}
- Replace the certhash variable (in green) with the thumbprint of the certificate you are installing. Remember to remove the spaces between the thumbprint's values as described above, if you have not already done so. The port number for the binding is emphasized in red text above, while the appid is in blue type. The appid parameter is a GUID that can be used to identify the owning application. You will have to generate a GUID (Globally Unique Identifier) for your application - there are many utilities available on the web that will let you do this - for example http://www.guidgenerator.com/
Now that the certificate binding has been configured, you may want to require clients to connect securely to the server using SSL.
For more information about SSL port bindings, see this MSDN article: http://msdn.microsoft.com/en-us/library/ms733791.aspx
