Creating and modifying side panels
Learn how to create or customize the way the side panels work.
About side panels
Where: Expand the Side panels node in the program configuration.
In the side panel configuration you can set up the various side panels in FotoStation and define their content. A side panel can be configured to contain different content, such as archives, actions, and projects. In its default configuration, FotoStation has Desktop, Archives, Projects, and Jobs tabs on the left side of the screen, and Actions are on the right. However, you can organize the side panels any way you want.
Creating, modifying, and deleting side panels
To create a side panel, click on the Left or Right node under Side panels in the configuration tree. Select New in the properties window to the right. There are five different types of side panels to choose from: Desktop, Archives, Actions, Projects, and Jobs. When you select New, FotoStation displays a new window where you can name the new side panel and choose its type. The type you choose affects the content that is displayed on the side panel. Therefore, by choosing to make an archives side panel, all configured archives will be displayed in the side panel. (You can hide certain archives from view by changing the side panel’s properties – see below for details.)
Common side panel properties
The properties available for the side panel depend on which type of panel you choose in the Content dropdown field.
However, two properties are the same irrespective of the type of side panel you choose:
Automatically activate right side panel: This option gives you greater control of your workflow by linking the side panel with a corresponding side panel on the right side of the screen. Therefore, when you access one side panel containing archives, a corresponding side panel on the right side of the screen opens to make it easy to send files to the actions it contains.
Never collapse: Normally, when you select the label of an active side panel, the entire side panel collapses into the side of the screen to make more room for thumbnails. However, if the Never collapse option is selected, the side panel cannot be collapsed this way. (You can still remove the side panel entirely from view through the options in the View menu.)
Remember last width: When this option is selected, FotoStation remembers the width of the side panel when you switch from one panel to another. This way it is possible to adjust the width of each side panel individually.
Desktop panel properties
The Desktop side panel lists the folders on your computer and network.

Specify root folder: Normally FotoStation lists all folders on your computer and gives you access to browse network resources. If you would like to limit access to folders, you can specify a root folder, for example the root folder of your image archive, to only allow access to subfolders within this folder from the Desktop side panel.
Show address bar: Select this option to display the full path to the selected folder at the top of the Desktop side panel.
Expand to last open folder: By selecting this option you can make FotoStation remember the last folder you accessed from the Desktop panel. This may be useful if you switch between the Desktop panel and other side panels.
Tip: If you want to copy files from a file system folder to a FotoStation archive, use the Desktop side panel to browse to the folder containing the files and select them. Now drag the files to the Archives tab while holding the cursor on the Archives label (Do not let go of the mouse button.)This opens the Archives side panel, letting you drop the files on any FotoStation archive to copy or move the files there. By pressing the Shift key on the keyboard you can alternate between copying and moving the file.
Allow saving and dropping files: Select this option to allow the dropping of files into folders in the Desktop side panel. If the option is not checked, you will not be allowed to drop files into a folder on the Desktop panel.
Allow image delete: Select this option to allow deletion of files in the folder tree.
Set disabled actions: Select this button to bring up a list of all configured actions, letting you disable certain actions when working with files from the Desktop side panel. The disabled actions will be grayed out when you browse folders in the Desktop side panel.
File Markers: To enable markers (visual, customizable indicators that can be used as a means of alerting a FotoStation user about files that meet certain criteria and should be given special attention), select a marker set from the dropdown list. Please refer to the Configuring File Markers chapter to learn how this feature can be put to use.
File Filters: To enable a file filter when working with folders in the Desktop side panel, select a filter from the dropdown list. For information on how to customize file filters, see Configuring File Filters.
Archives panel properties

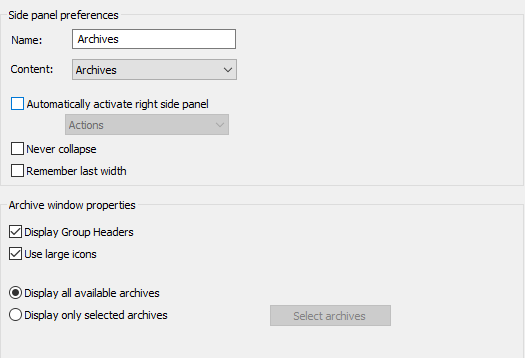
An Archives side panel contains all configured archives in FotoStation. You can create several archives side panels and specify which archives you want to display on each side panel. This way it is possible, for example, to sort local and network archives on separate side panels.
Display Group Headers: When creating an archive it is also assigned to a group that you choose. Selecting this option turns on group headers that can be collapsed and expanded. The archives on the side panel will then be grouped accordingly.
Use large icons: Select this option if you would like to use large archive icons for better visibility.
Display all available archives: Normally, an archive tab displays all archives that have been configured in FotoStation. If you would like to only show certain archives on the side panel, for example, to organize archives on several archives side panels, select the following option instead.
Display only selected archives: To only display certain archives on the side panel, select this option, then select Select archives to choose which archives you want to include.
Have you created a new archive, but can’t find it?
If you have created an archive, for example from the Desktop side panel, but can’t find it on the Archives side panel, you have most likely configured your Archives side panel to only show a selection of archives. If so, open the side panel preferences page shown above and select Select archives button. You can choose to include the archive that is missing on the side panel.
Actions panel properties

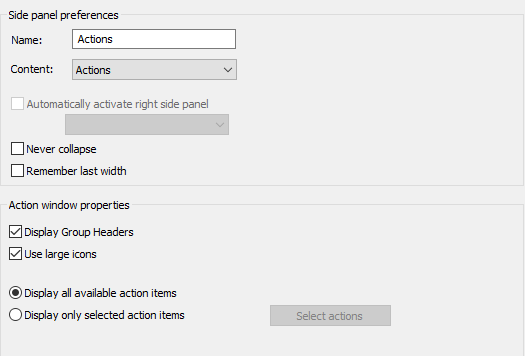
The Actions side panel is typically located under the Right node in the configuration tree, but you can also create Actions side panels that appear on the left side of the screen if you prefer. This side panel contains all actions configured in FotoStation. If you like you can create several Actions side panels and configure each only to only display selected actions.
Display Group Headers: When creating an action it is also assigned to a group that you choose. Selecting this option turns on group headers that can be collapsed and expanded. The actions on the side panel will then be grouped accordingly.
Use large icons: Select this option to use large action icons for better visibility.
Display all available action items: Normally, an Actions tab displays all actions that have been configured in FotoStation. If you would like to only show certain actions on the side panel, for example, to organize them on several Actions side panels, select the following option instead:
Display only selected action items: To only display certain actions on the side panel, select this option, select Select actions to choose which actions you want to include.
Projects panel properties

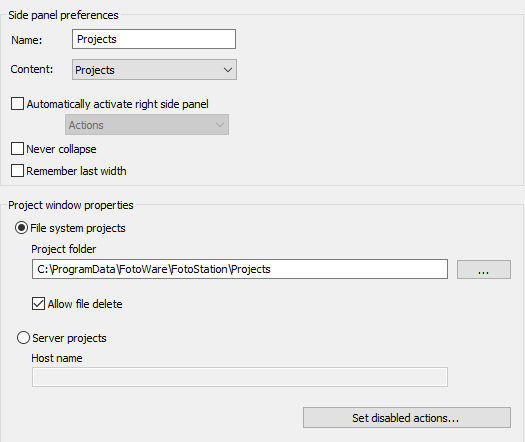
The Projects side panel is used to set up the location of projects, i.e. collections of files that are not physically in the same location.
File system projects can be stored either on a local disk or on a shared network folder. Placing the project folder in a shared folder will allow FotoStation clients to work with the same projects. Note, however, that it does not allow sharing of projects across Windows/Macintosh platforms. These are the same type of projects that were used in FotoStation 6, so you can point the project panel to an existing project folder and use all your version 6.0 projects this way.
Server projects are controlled by a SQL project server that is installed alongside the Index Manager server. To use these server projects, enter the host name (server name) of the server where the project server is installed. If you are uncertain about this setting, consult your network administrator.
To learn more about how you can work with projects, see Creating Projects.
Set disabled actions: By disabling access to actions from the project panel you can take greater control of the workflow. Select the actions or groups you would like to disable as outputs from the project side panel. This setting will apply to all projects on the side panel.
Jobs panel properties
The Jobs side panel has no options.
Changing the order of side panels
To rearrange the order of the side panels, expand the Side panels node in the configuration tree, then click on either the Left or Right node to display the list of side panels in the right part of the configuration window. Select the side panel that you want to move up or down, then click on Move up or Move down.
Deleting a side panel
To delete a side panel, expand the Side panels node in the configuration tree, then select the Right or Left node to display the list of side panels. Select the side panel you want to delete and select Delete.
