Using an Index Manager search result as a channel input
This topic explains how to configure a Color Factory channel to search an Index Manager archive and process the assets that are found.
Index Manager search input
In Color Factory Settings, expand the relevant channel and select Input & Output Options.
Open the Remote Input tab.
The following dialog appears.
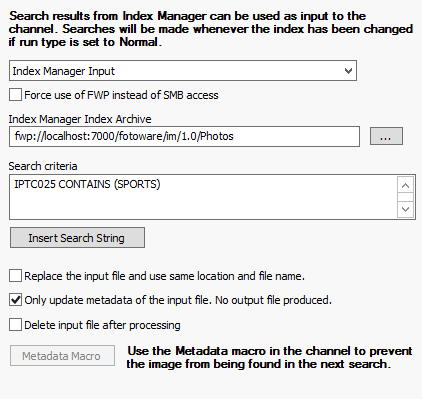
Here you can set up the channel so that Index Manager notifies Color Factory when an index has been updated. Color Factory will then send a search request to the Index Manager server and process any hits. To use this functionality you must input the path to the index folder and the search criteria, either by entering it manually or by choosing Insert Search String.
Select Browse (...) to open the Index Manager browse dialog, which you use for locating an index on an Index Manager server. You will need to know the hostname of the Index Manager server to list its indexes.
Force use of FWP instead of SMB access
Select this option to force Color Factory to use FWP for transferring the files retrieved in the search. Color Factory then ignores any SMB path that the Index Manager server provides and always requests the file(s) via the FWP/FWPS protocol.
Replacing the input file
Replace the input file and use the same location and file name - Color Factory saves the processed file in the original folder, overwriting the file originally found in the archive and overriding any output folder and auto routing settings.
Note: When using this option, you cannot use the Metadata Macro feature (described below) to update the original file to prevent double processing. That's because the input file will be tagged with the macro and then overwritten by the ready-processed file that does not contain the tag set in the macro.
Therefore, to avoid double processing when choosing to replace the input file, you should also enable the Metadata feature in the channel and use a General Metadata Macro to update the file that is being processed.
Only applying metadata updates to the input file
Only update metadata of the input file. No output file will be produced - all enabled metadata features in the channel will be applied to the found file(s), but the channel will not produce an output file - the files are updated in their original location.
Deleting the input file after processing
Delete input file after processing - The input file will be deleted from the archive after the file has been processed. Note that enabling this option rules out the above feature and vice versa.
Avoiding double processing by updating the processed file's metadata
To ensure that Color Factory doesn’t process the same file in the index archive indefinitely, select Metadata Macro to change the metadata in one or more fields in the image found. This way, when Color Factory queries Index Manager, files that have already been processed will not be found again.
To do so: select Metadata Macro to open the metadata editor and select Add Field to begin adding a criterion. Typically, you now add information that the file has been processed, or you may want to alter the contents of a certain field.
Example
All unprocessed files in the archive have been tagged Unpublished in the Edit status field (metadata field #007). The channel uses the Index Manager search input feature to find unprocessed files by searching for this string. After processing, you want to change the status to Published and insert the date of publishing to avoid processing the same file twice.
First, choose Field #007 – Edit Status in the Field to Add drop-down list. Then choose an action, in this case, to replace the previous field content. Enter the new field content in the edit window, for instance, Published, and select Insert Code. Select %%INSDATE in the list to insert the date of processing the image. Typically, this would be sufficient to tag processed files with the necessary information. However, you can also choose a criterion that must be met for the action to happen. To specify a condition, select the corresponding checkbox and choose, for instance, #007 – Edit Status Contains unpublished.