Configuring transfers from Microsoft 365
You can use Connect to retrieve emails from a Microsoft 365 mailbox using IMAP and access keys. However, you can only receive emails from Microsoft Outlook; you cannot send or forward emails. Accordingly, if you select Microsoft as the hosting provider, you can only specify Source folders for the mail server.
Rebex is the vendor of the underlying tool that Fotoware uses for this feature. For more information, see Office 365 and IMAP or POP3 with OAuth 2.0 authentication in unattended (app-only) mode.
For information about using Connect with other email servers, see Configuring transfers to or from an email server.
Note: This feature works only with Microsoft Office 365 Outlook.
Creating a mail server connection with Microsoft 365
- In the Connect Settings app, go to Servers.
- Select the group to which you want to add the server and select Add server. You must specify some general settings for the server before defining the source folder you want to use for file transfers.

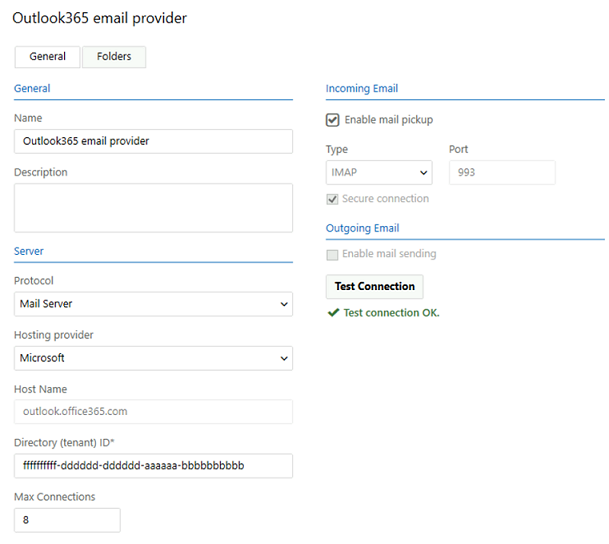
- Enter the following information:
Name: Enter a short descriptive name for the mail server.
Description: Enter a more detailed description (255 character limit) if necessary.
Protocol: Select Mail Server from the drop-down list.
Hosting provider: Select Microsoft from the drop-down list.
Host Name: outlook.office365.com is automatically displayed here and is read-only.
Directory (tenant) ID: Use the ID you configured in Azure Portal.
Max Connections: Specify the maximum number of connections Connect may open to the mail server simultaneously.
-
Select Enable mail pickup for Connect to use the mail server as a source for a channel (i.e., to retrieve emails and attachments from the server). The Type and Port values are entered automatically and are read-only. Secure connection is selected by default.
-
Enable mail sending is not available when Microsoft is selected as the hosting provider for the mail server.
- Select Save.
Next, you can define the source folder for the emails.
